For many, the thought of growing mushrooms at home is intimidating, and a little online research often unveils lots of technical information, confusing terminology and complicated techniques.
But mushroom growing is not that complicated, and beginners can easily grow mushrooms on a small scale using simple methods and minimal equipment.
There are several low-tech methods suitable for beginners, and PF Tek is one of them.
Read on to learn what PF Tek is, its pros and cons and how to grow mushrooms using the PF Tek method step-by-step.
What Is The PF Tek Method?
PF Tek, short for Psilocybe fanaticus technique, is an affordable, beginner-friendly technique for growing mushrooms indoors.
Professor Robert McPherson developed PF Tek in 1991 as a reliable method for growing mushrooms at home without needing any specialized equipment.
Although it’s not the highest-yielding method of growing mushrooms, PF Tek is popular with Psilocybe growers and works for gourmet mushrooms that grow on grain.
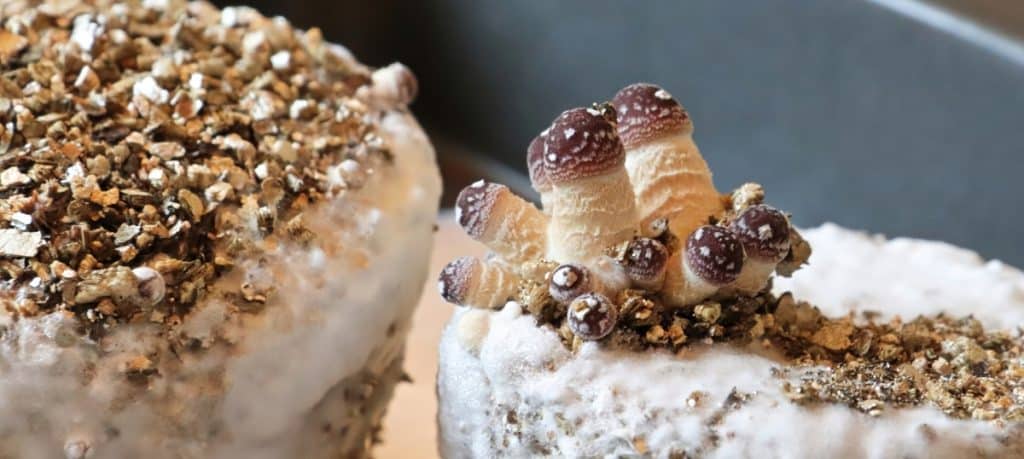
The PF Tek method uses vermiculite and brown rice flour to create small fruiting blocks called BRF (brown rice flour) cakes.
PF Tek allows beginner mushroom growers to learn more about the mushrooms’ life cycle, what conditions mushrooms need to grow and how to sterilize substrates while keeping costs low.
Many growers have developed variations on PF Tek, which beginners may find confusing, but if you stick to the original method, it’s relatively straightforward.
How Long Does the PF Tek Method Take?
The time needed to grow mushrooms using PF Tek varies depending on the type of mushrooms you’re growing and the conditions you provide.
Some mushroom species grow much faster than others. Our article, “How Long Does It Take To Grow Mushrooms? All Questions Answered,” has more information for you.
But generally, you can work on a timeframe of around 6 weeks. This includes 2 to 4 weeks for the mycelium to fully colonize the substrate and another 1 to 3 weeks for mushroom growth.
How to Grow Mushrooms With PF Tek Step-by-Step
In the steps below, we’ll take you through the PF Tek method step by step, and you’ll learn how to create your own BRF cakes.
But this is not the only option. In many countries, you can buy pre-sterilized PF Tek jars or BRF cakes online on eBay or from specialist suppliers.
If you buy pre-sterilized PF Tek Jars, you’ll skip the substrate preparation and sterilization part of the process and start with inoculation.
Follow the steps below to grow mushrooms at home using the original PF Tek method.
Step 1: Gather Supplies
Before you begin, you’ll need to ensure you have all the necessary supplies and equipment, including the following:
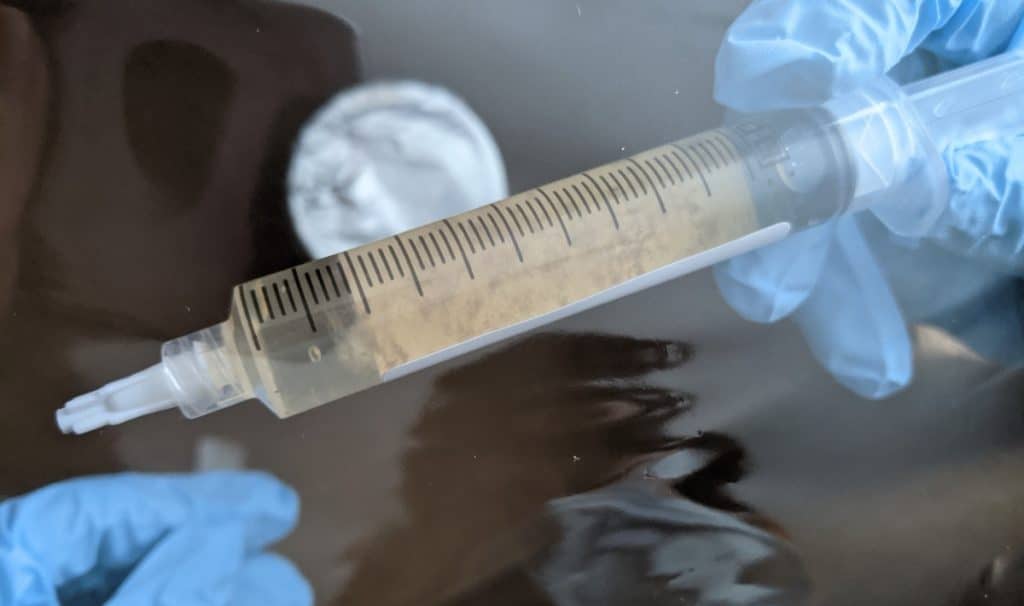
A Syringe Containing Mushroom Spores or Culture
The PF Tek method uses liquid inoculation, meaning you’ll inject a solution containing mushroom spores or mycelium into the substrate.
A spore syringe contains mushroom spores in a sterile solution, and a culture syringe contains mushroom mycelium growing in a nutrient-rich solution.
You can buy spore syringes and liquid mushroom culture online. Which you use will depend on the species you want to grow and what’s available in your area.
We recommend buying your spore syringe or mushroom culture from a reputable supplier nearby to reduce the transportation time.
You can also make your own mushroom spore syringe using spores from a mushroom spore print.
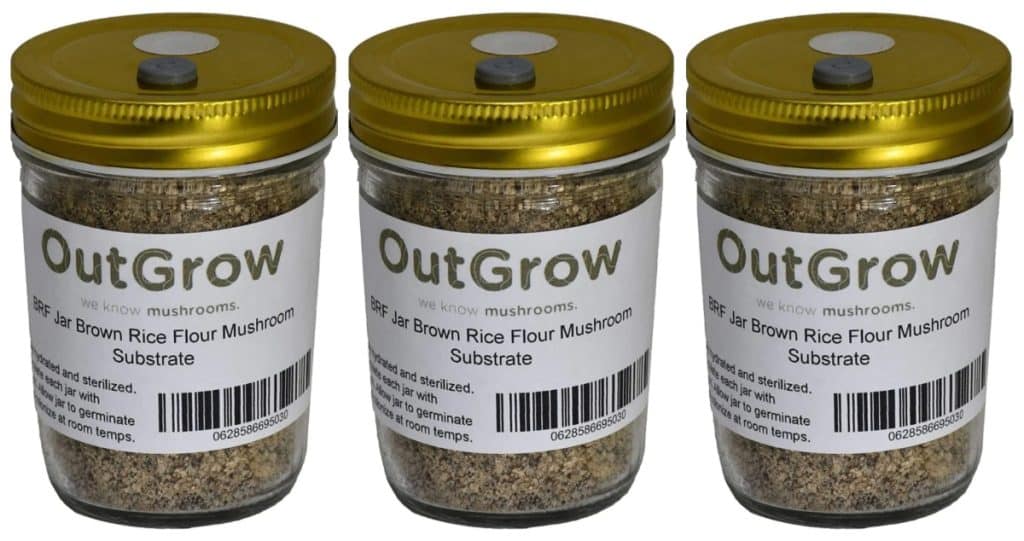
Substrate / BRF Cake Ingredients
The PF Tek method uses a substrate mix made from the following ingredients:
- Vermiculite – a porous, inert natural substance found at most garden centers. Mushroom growers use it in substrate mixes to help with moisture retention and aeration.
- Brown rice flour (BRF) – a finely ground flour, usually available in health stores, made by milling brown rice to a fine powder. It’s relatively inexpensive, readily available and provides the nutrients mushroom mycelium needs to grow. If you can’t find brown rice flour, buy whole brown rice and grind it to a fine powder using a coffee grinder.
- Water – Tap water suitable for drinking is usually fine for mushroom substrates, but some growers prefer to use distilled water as it contains fewer chemicals.
Heat Resistant Containers With Modified Lids
To grow mushrooms using the PF Tek method, you need containers that can withstand heat and preferably have lids.
The containers also need an opening as wide or wider than the rest of the container so that the fully colonized cake can slide out easily.
Growers recommend using ½ pint (240 ml) containers for PF Tek as larger containers take longer to colonize, increasing the chances of contamination, and smaller containers provide smaller yields.
Wide mouth ½ pint (240 ml) mason jars are a popular choice as they’re readily available, reusable and relatively inexpensive.
Your mason jar lids need holes to insert the syringe for inoculation and to allow some fresh air exchange during colonization.
Depending on where you’re based, you may be able to buy modified mason jar lids that come with a self-healing injection port and an air filter for air exchange.
But if not, all you need to do is make 4 small holes, slightly bigger than the syringe needle, near the edge of your jar using a nail and hammer.

Household Items
One of the reasons PF Tek is ideal for beginners is that most of the equipment you need is regular household items that you’ll already have, including:
- A hammer and a small nail to make holes in the jar lids
- A mixing bowl and spoon to prepare the substrate
- Tin foil to cover the top of the jars during sterilization
- A large pot with a lid or a pressure cooker for sterilization
- A metal rack, jar lids or something similar to keep the jars from touching the bottom of the pot or pressure cooker
- An alcohol burner or lighter to sterilize the needle
Step 2: Prepare Substrate
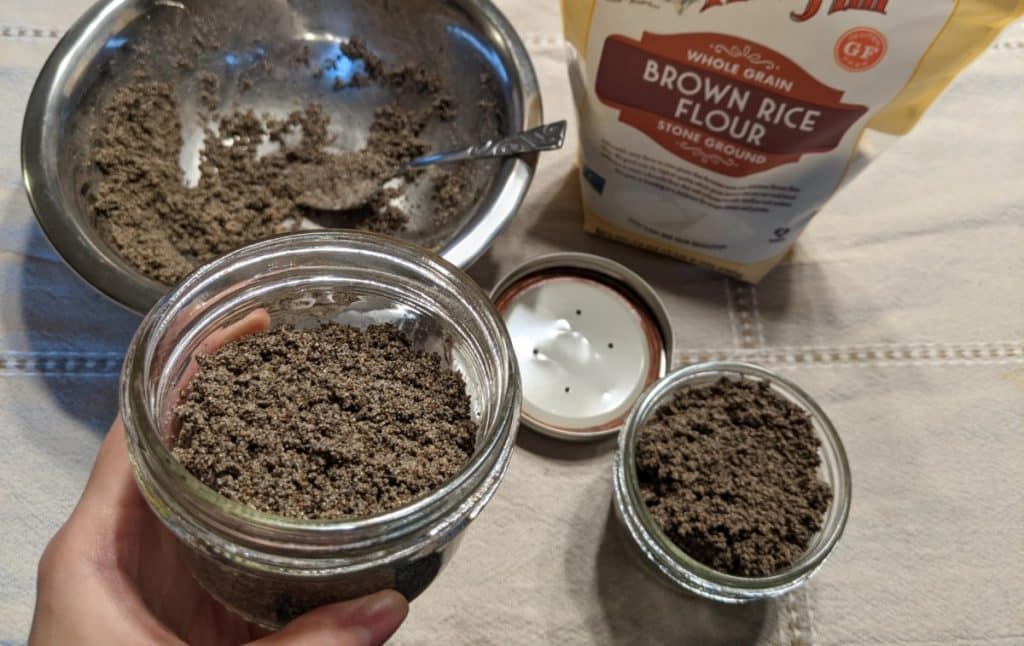
Once you have all your supplies, the next step is to prepare your mushroom substrate. PF Tek uses a substrate mix of 2 parts vermiculite, 1 part water and 1 part brown rice flour (BRF).
Measure out the vermiculite, brown rice flour and water for the number of jars you want to fill. An easy way to do this is to use your jars.
For example, if you plan on filling 6 jars with substrate, to make 6 BRF cakes, you’ll need 4 jars of vermiculite, 2 jars of water and 2 jars of brown rice flour.
This measurement method is not exact, and you may have some leftovers. If you’re a more precise type of person, you may prefer to use the measurements below:
| ½ pint (240 ml) Jar | Vermiculite | Water | Brown rice flour |
| 1 jar | 120 ml (½ cup) | 60 ml (¼ cup) | 60 ml (¼ cup) |
| 2 jars | 240 ml (1 cup) | 120ml (½ cup) | 120ml (½ cup) |
| 4 jars | 480 ml (2 cups) | 240 ml (1 cup) | 240 ml (1 cup) |
| 6 jars | 720 ml (3 cups) | 360 ml (1½ cups) | 360 ml (1½ cups) |
Place your vermiculite in a mixing bowl and slowly add the water, stirring with a spoon, to ensure all the vermiculite is wet.
Before adding the Brown Rice flour, it’s best to check that you have the correct amount of moisture.
To do this, tilt the bowl. If a few drops of water seep from the vermiculite, it has the correct amount of moisture.
But if there’s a lot of water, you’ll need to place the vermiculite in a colander and let it drain for a minute.
When you’re happy with the moisture content, add the brown rice flour and stir the mixture well until every piece of vermiculite is uniformly coated with flour.
Step 3: Place Substrate in The Jars
When your substrate is well mixed, it’s time to fill your jars.
Spoon the substrate loosely into the jars, leaving around 0.5 inches (1 cm) of space at the top.
Don’t tap the jars or push the substrate down to compact it. You want it to be loose and airy, providing air pockets for the mycelium during colonization.
Ensure the top part of the jar, above the substrate, is clean. If necessary, use a clean cloth to remove any moisture or substrate residue inside and outside the top of the jar.
Once the top of the jar is clean and dry, fill the 0.5-inch (1 cm) space with dry vermiculite. The dry vermiculite forms a barrier between the substrate and the air that helps to prevent contamination.
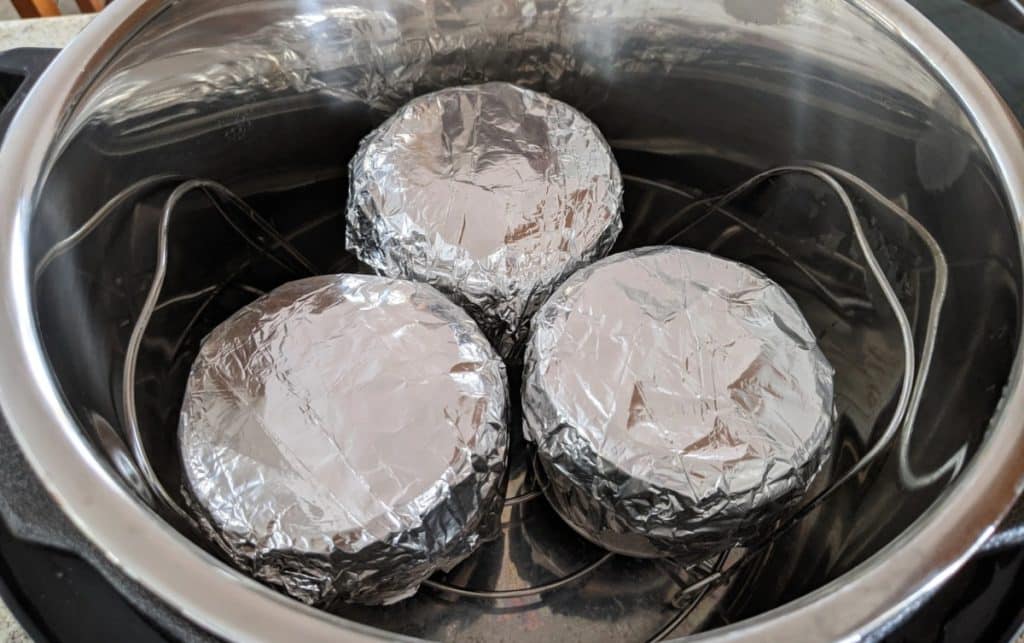
Now, put the lids on your jars and cover them with tin foil to prevent water from getting into the holes during sterilization.
Step 4: Sterilize The Jars of Substrate
To properly sterilize a substrate and kill all living organisms and spores, you’ll need temperatures over 250°F (121°C) for at least 2 hours.
Most small-scale mushroom growers use a pressure cooker and sterilize their jars at 15 PSI for 45 minutes.
But, because PF Tek aims to make mushroom growing beginner-friendly and inexpensive, brown rice flour is used, meaning you can use a large pot with a lid to steam your jars for an hour and a half.
While this is not true sterilization but rather heat pasteurization, it reduces the number of competing organisms in the substrate, giving the mycelium a head start.
For this method, place around 1 inch (2.5cm) of water at the bottom of a pot, with a rack or something similar, to keep the jars above the water.
Place your jars on the rack and heat the water until it is steaming, then start timing. Keep an eye on the pot and add water if necessary to prevent it boiling dry.
If you replace the brown rice flour with flour made from another type of grain, you’ll need to use a pressure cooker for sterilization.
After sterilization, leave your jars in the pot or pressure cooker to cool down.
Step 5: Inoculation
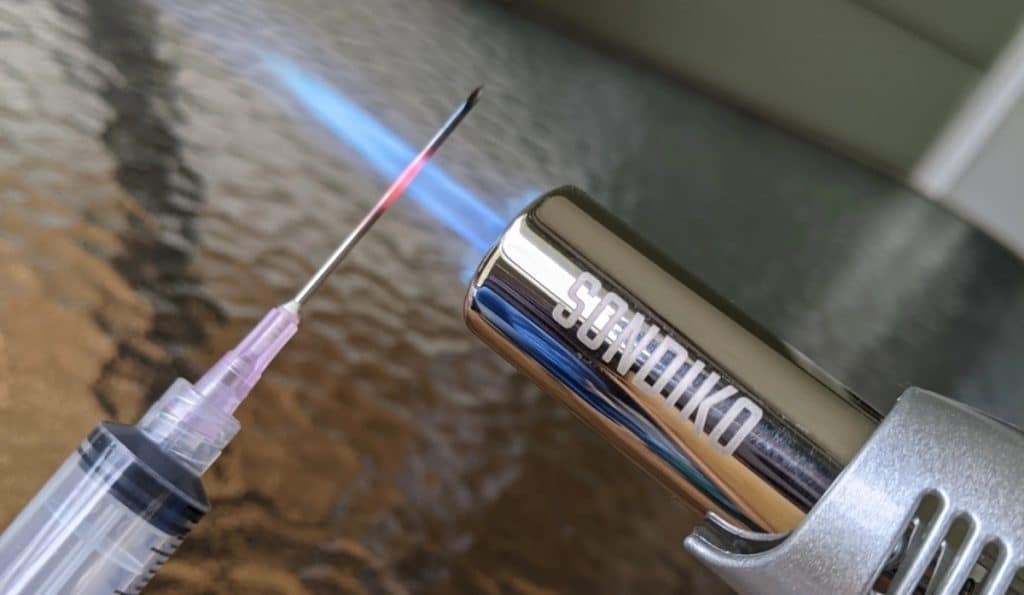
Inoculation is the name given to the process of adding mushroom spores or culture to a nutritious growing medium.
The PF Tek method uses a syringe with a sterilized needle to inject the spores or culture into the substrate in your jars.
This is one of the stages in mushroom growing where you can easily introduce contaminants, so you’ll need to take steps to reduce the chances of this happening.
Mushroom farmers usually inoculate substrates in front of a laminar flow hood, but beginners can use a glove box, still air box or even a closed clean room, for example, a bathroom.
Once you have prepared a clean workspace, ensure your jars have cooled to room temperature, as hot substrate may kill the mushroom spores or mycelium.
Remove your jars from the pot or pressure cooker and place them on your clean workstation. Take the foil off the top of your jars.
Shake your syringe to distribute the spores or mycelium evenly through the liquid, then sterilize the syringe needle over a flame until it’s red hot.
Allow the needle to cool slightly, and then insert it into one of the holes in the lid of your jar at a slight angle so the tip is up against the inside of the glass.
Inject 0.25 to 0.5 ml of the solution into each of the 4 holes in the lid of your jar. You should see the liquid running down the inside of the glass.
Inoculating the substrate close to the glass means you’ll see the mycelium as soon as it grows and know that colonization is going as planned.
After injecting the spore or culture solution into the jars, cover the holes in the lid with breathable micropore tape to allow a little fresh air exchange during colonization.
It’s best to flame sterilize the needle again between jars to help prevent contamination.
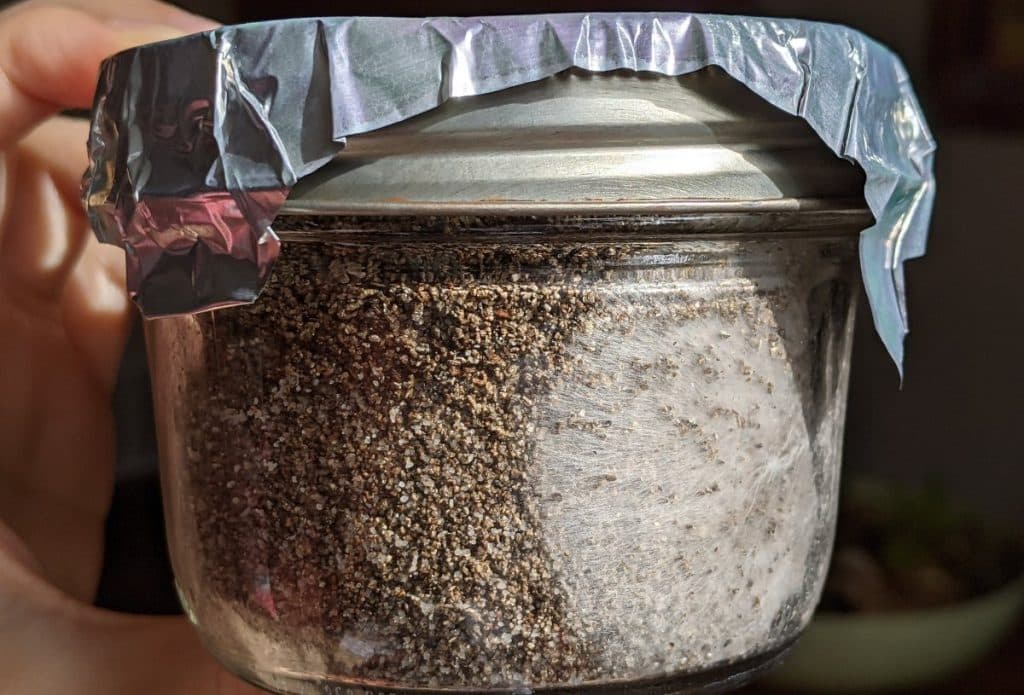
Step 6: Incubation
After inoculating the substrate, place your jars on a shelf in a warm, dark spot for incubation.
During incubation, the mushroom mycelium will grow and spread throughout the substrate, feeding on the nutrients it provides.
Ideal incubation temperatures vary from species to species, but generally room temperatures of 70-75°F (21-24°C) are perfect for incubation.
Colonization times also vary depending on the species, and it could take 2 to 4 weeks for the mycelium to fully colonize the substrate.
Step 7: Birthing
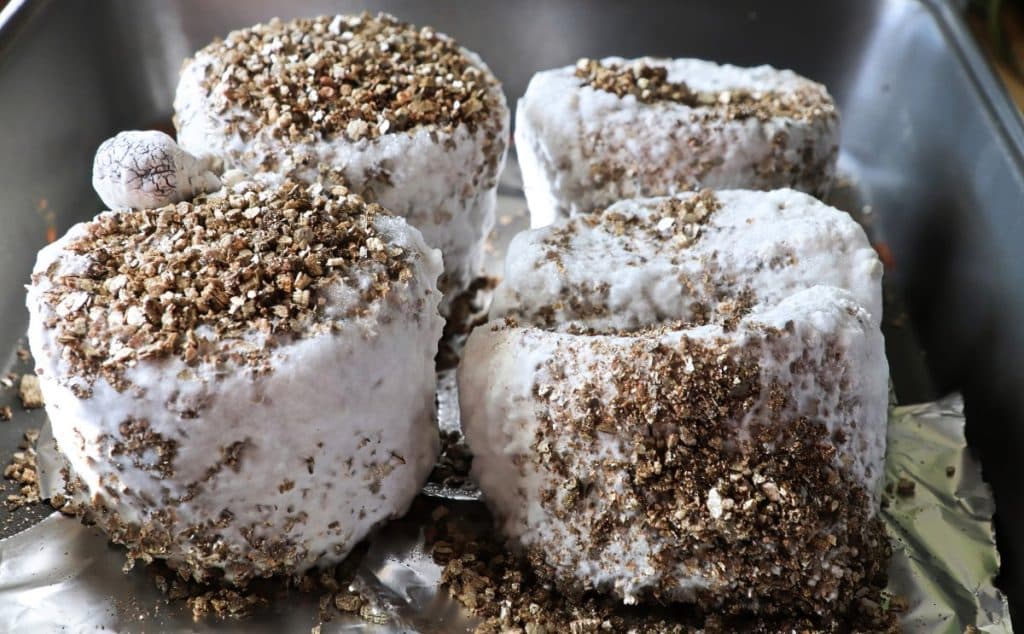
Birthing is the name given to the process of removing your fully colonized BRF cake from the jar.
First, wash your hands well and put on some clean gloves. Then, open the jar and pour out the barrier layer of dry vermiculite at the top.
Now, remove the cake from the jar. An easy way to do this is to turn the jar over in your hand and tap the bottom until the cake comes out.
Take care not to drop the cakes. Although they’re relatively firm, they may crack or break apart if they fall.
You want to avoid cracks, as the external mycelium layer on your cakes protects them from airborne contaminants. Broken or cracked cakes are more susceptible to contamination during the fruiting stage.
Once you have birthed your cake, you can move on to the next step, called dunk and roll.
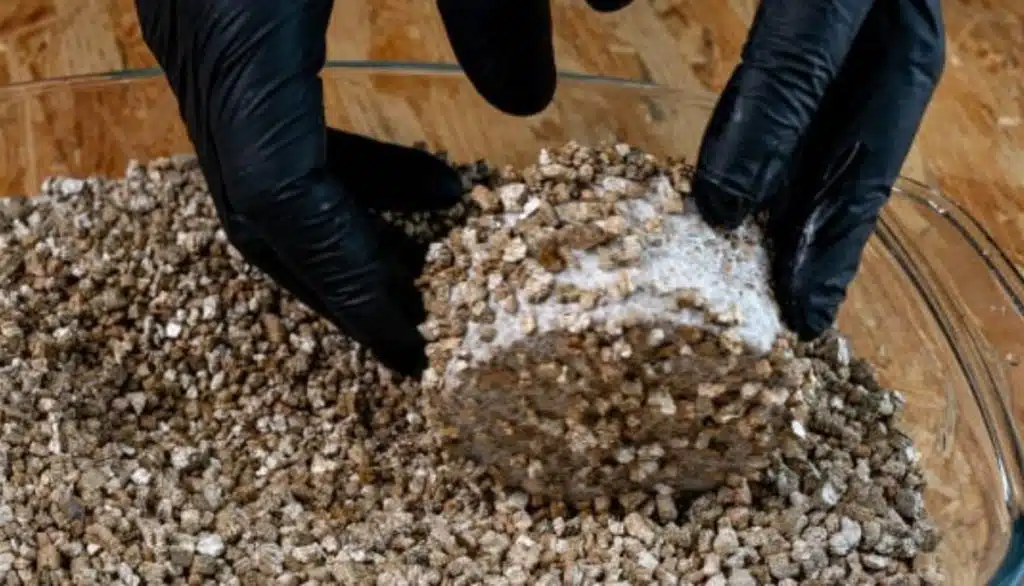
Step 8: Dunk and Roll Your BRF Cakes
This step of the process is optional. You could place your newly birthed BRF cakes directly into your fruiting chamber, but dunking and rolling is an easy step that increases yields.
Dunking involves soaking your cakes in cold tap water for 12 to 24 hours. This rehydrates the substrate, providing the mycelium with the moisture required to grow, and also helps to stimulate fruiting, the same way a good autumn rain would in the wild.
When you place the cakes in the water, they’ll usually float, so you’ll need to weigh them down with something to ensure they’re fully submerged. After dunking your cakes, you’ll need to complete the rolling part of the process.
To prepare for this, wipe down a plastic container with isopropyl alcohol and add a deep layer of clean, dry vermiculite.
Some people like to sterilize their vermiculite first in the oven. This is only necessary if you’re using an old bag of vermiculite that’s been open for a while.
Remove your soaked cakes from the water and roll them in the dry vermiculite until they’re evenly coated on all sides. This layer of vermiculite acts like a casing layer and helps the cakes to retain moisture.
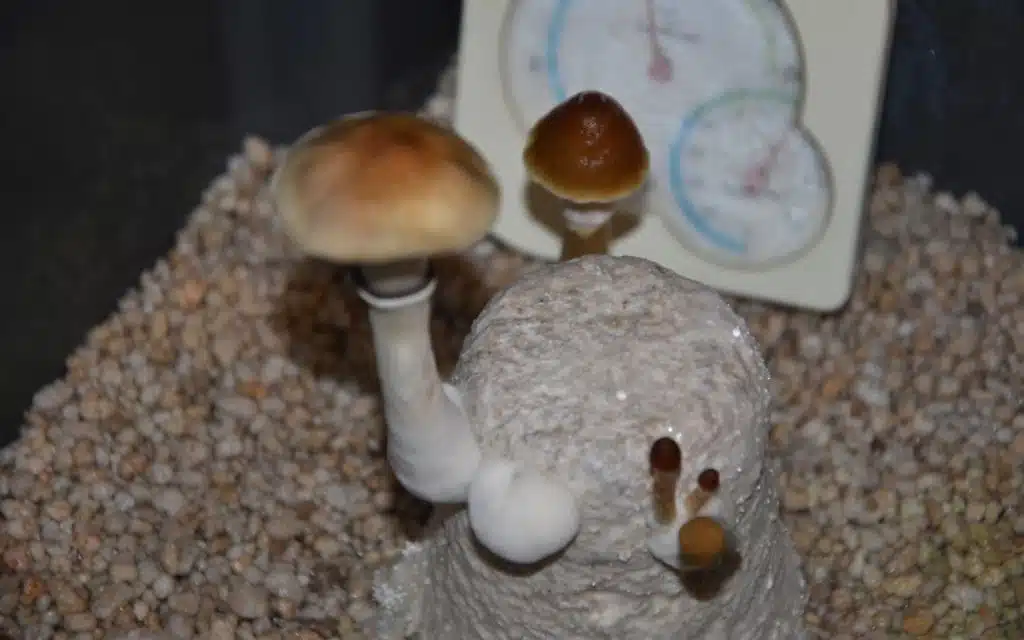
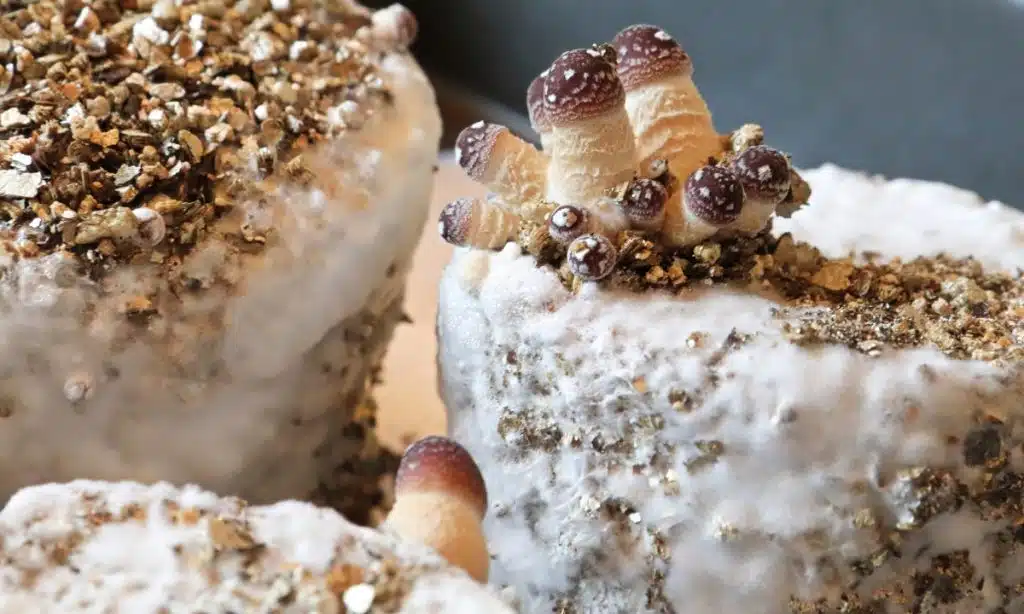
Step 9: Fruiting
After rolling, your cakes are ready for fruiting. You’ll need a fruiting chamber to provide the mycelium with the ideal fruiting conditions.
Shotgun fruiting chambers are inexpensive, easy to make and often used for the PF Tek method. They have a layer of moist perlite at the bottom that helps maintain humidity levels.
Our guide to building a shotgun fruiting chamber will take you through the process of making one step by step.
You can use a wire rack, canning lids or pieces of tin foil to keep your cakes off the damp perlite.
Whichever you choose, wipe them down with isopropyl alcohol before placing them in the fruiting chamber.
Leave at least 2 inches (5 cm) between your BRF cakes to allow airflow and space for your mushrooms to grow.
You’ll need to mist the mycelium daily to maintain humidity levels, and open the chamber to ensure enough fresh air exchange.
Depending on the species, you could harvest your first fresh gourmet mushrooms in 2 to 3 weeks.
BRF Cakes usually provide 2 to 3 flushes of mushrooms. After harvesting, dunk your cakes again for 12 to 24 hours to rehydrate them and initiate pinning of the next flush.
Pro’s and Con’s of PF Tek
Like all mushroom-growing techniques, PF Tek has advantages and disadvantages.
Pros of PF Tek
- Inexpensive
- You don’t need specialized equipment.
- An easy way for beginners to learn about mushroom growing.
- You don’t need much space.
Cons of PF Tek
- You can only grow a limited number of species.
- PF Tek uses small substrate cakes, so you get smaller yields.
- The substrate mix needs sterilization.
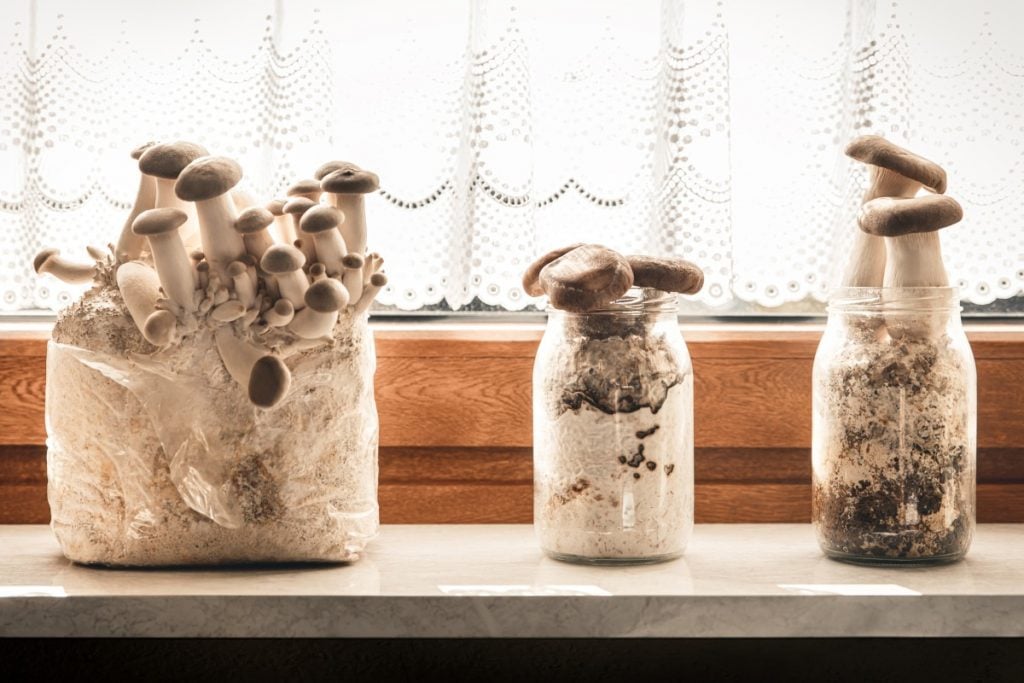
What Mushrooms Grow Best in Jars?
The PF Tek substrate mix is not the only way to grow mushrooms in jars. You can also grow mushrooms in jars using other substrate recipes.
For example, you can replace the brown rice flour with flour from other grains like millet or rye and the vermiculite with other substrate materials like coco coir.
If you want to grow wood-loving species like shiitake or reishi mushrooms, try using hardwood sawdust instead of vermiculite.
Below is a list of some of the mushroom species you can grow using the PF Tek method.
- Psilocybe cubensis
- Lion’s mane (Hericium Erinaceus)
- Shaggy mane (Coprinus comatus)
- Elm oyster (Hypsizygus ulmarius)
- Pioppino (Agrocybe aegerita)
- King oyster (Pleurotus eryngii)
- Oyster mushrooms
Easiest Ways for Beginners to Grow Mushrooms
While PF Tek is a good option for beginners, we feel one of the easiest ways for beginners to begin their mushroom-growing journey is by growing oyster mushrooms on a straw substrate.
Oyster mushrooms are one of the easiest species to grow, as they’re hardy and fast-growing and thrive on readily available, low-nutrient substrates.
You can grow oyster mushrooms on substrates like straw, cardboard and coffee grounds in bags, buckets, bottles or other plastic containers.
The container options are endless, as these less-nutritious substrates don’t need sterilization. Pasteurization will do, and there are several easy pasteurization techniques that are ideal for beginners.
Monotubs are also popular with beginners as they function as a substrate container and a fruiting chamber, helping beginners create ideal fruiting conditions.
Final Thoughts
Growing mushrooms at home is very rewarding and provides you with an ongoing supply of delicious, nutritious mushrooms with several health benefits.
PF Tek is an inexpensive, reliable and beginner-friendly technique for growing mushrooms at home, but it’s not the only way for beginners to get started.
To learn more about growing mushrooms the low-tech way, visit our Mushroom Growing Hub or try our introductory mushroom growing course.
In this course, we take you by the hand and walk you step-by-step through the easiest way to grow oyster mushrooms at home.


