Growing mushrooms at home is not only fun and rewarding. It also provides a delicious source of healthy nutrients and potential income.
If you’re a beginner, growing mushrooms indoors in containers is a great way to get started.
We’ve been growing mushrooms in buckets for many years now and have found it to be one of the easiest methods for beginner growers without the need for much in the way of specialist equipment.
In this article, we explore what types of mushrooms you can grow in buckets and the best substrates to use.
You’ll also find a step-by-step guide to growing mushrooms in buckets, the pros and cons as well as some of the common issues encountered and how to address them.
Why Grow Mushrooms in Buckets?
- Growing mushrooms in buckets is an easy and rewarding way to produce delicious healthy mushrooms.
- It’s the perfect way for beginners to grow mushrooms and requires no special skills or previous experience.
- You don’t need expensive, specialized equipment to grow mushrooms in buckets, and you can produce a large number of mushrooms with minimal effort.
- Growing mushrooms in buckets is perfect for smaller-scale mushroom production and urban mushroom cultivation.
- It reduces single-use plastic waste and makes mushroom production more sustainable.
- You don’t need a lot to set up a productive mushroom cultivation system in a spare room, closet or basement.
Step by Step Guide to Growing Mushrooms in Buckets
In this step-by-step guide, we take you through the process of growing oyster mushrooms in a bucket. We’ll use oyster grain spawn, straw as a substrate and hydrated lime pasteurization, but you can also pasteurize with hot water like we show in our YouTube video about growing mushrooms in buckets:
Step 1: Gather Supplies
Before you can begin growing oyster mushrooms in buckets, you’ll need to gather supplies and materials.
You’ll need:
1. A plastic 5 gallon (20 liter) bucket with a lid.
You can either buy a new bucket, readily available and inexpensive or recycle a bucket you already have.
If you are using a second-hand bucket, consider any chemicals that may have been in it before.
If you are not sure, then it’s best to start with a new clean bucket.
2. Oyster mushroom grain spawn.
You’ll want to use spawn at a rate of five to ten percent to grow oyster mushrooms in a 5 gallon (20 liter) bucket.
Thus you’ll need 2.5 – 5 lbs (1 – 2.3 kg) of grain spawn for each 5 gallon (20 liter) bucket.
A ten percent spawn rate colonizes the bucket faster and increases your chances. But, you can use less and still be successful.
Grain spawn produces bigger yields than sawdust spawn, so try to source grain spawn if possible.
If you live in the UK, you can buy oyster mushroom grain spawn online from us.
If you live outside the UK, search for “Oyster mushroom spawn + your country.” Most countries have several suppliers. You’ll also often find oyster mushroom spawn on Amazon or eBay.
Once you have a little experience, you may want to grow your own mushroom spawn. Our article How To Grow Your Own DIY Mushroom Spawn has more information on how to do this.
3. Substrate material.
We recommend shredded/chopped straw or sugarcane bagasse as its particle size enables good air exchange.
If you cannot find chopped straw, you can buy a bale of straw and cut the straw into short pieces less than 2 inches (5 cm) in length.
You’ll need enough chopped straw or bagasse to pack your bucket tightly.
4. A drill with a 1/2 inch (12mm) drill bit.
You will use this to make holes in the bucket.
5. Alcohol and water disinfectant in a spray bottle.
Make your own alcohol-water disinfectant mix. It is more effective than alcohol on its own.
Mix seven parts methylated spirits, rubbing alcohol or isopropyl alcohol with three parts water in a spray bottle and shake well.
Make sure to label the spray bottle and keep it out of reach of children.
6. Micropore tape.
Micropore tape is breathable, adhesive paper tape. You’ll find it at pharmacies with band-aids and wound coverings.
Covering the holes in the bucket with micropore tape during incubation helps to keep moisture in and still allows air exchange.
7. Equipment for pasteurization
- A container to hold water. This container should be big enough for the amount of substrate you want to pasteurize
- A netted bag to hold your substrate while in the water.
- Hydrated lime. Hydrated lime is calcium hydroxide, often sold as builders’ lime in hardware stores.
Make sure the magnesium content of the brand you buy is less than five percent. Higher levels of magnesium will stunt the growth of your mushroom.
- A pH meter
- Gloves and a face mask
Step 2: Prepare Your Bucket
Once you have all your supplies, the next step is to prepare your bucket.
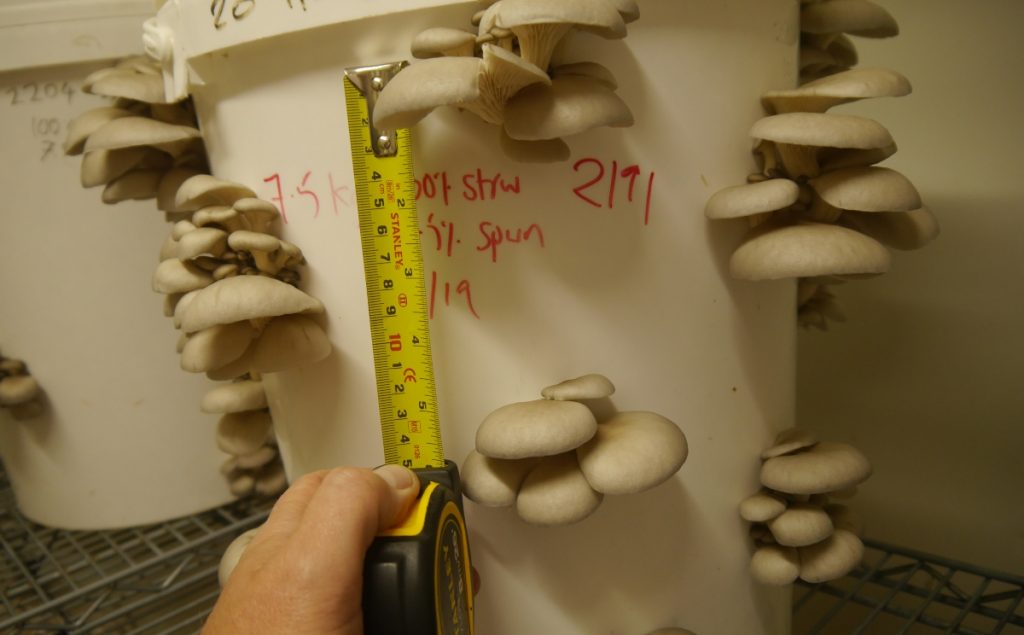
Firstly drill holes all around the sides of your bucket. There are no set rules for this, but we recommend making holes that are 0.4 – 0.6 inches (10 – 15mm) in size, spaced 4 to 6 inches (10 to 15cm) apart.
The holes in the side of the bucket are for both ventilation and fruiting.
During colonization, the mycelium produces carbon dioxide. The holes in the bucket allow fresh air to circulate and regulate the levels of carbon dioxide.
You can also drill a few smaller holes in the bucket’s base to allow any excess water to drain.
When you’ve finished drilling the holes, use a razor or knife to remove any jagged bits. Then wash your bucket and lid well with warm soapy water.
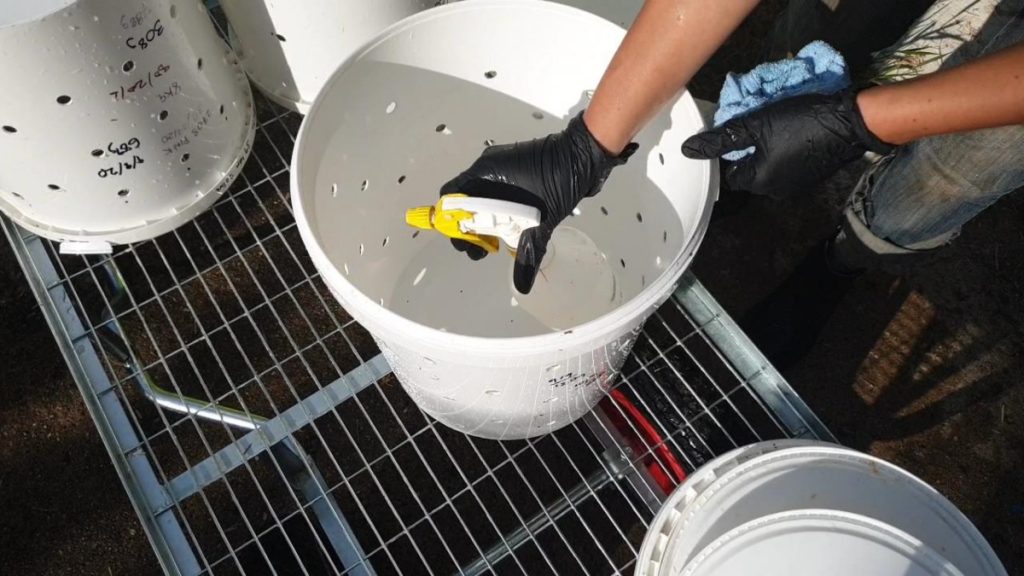
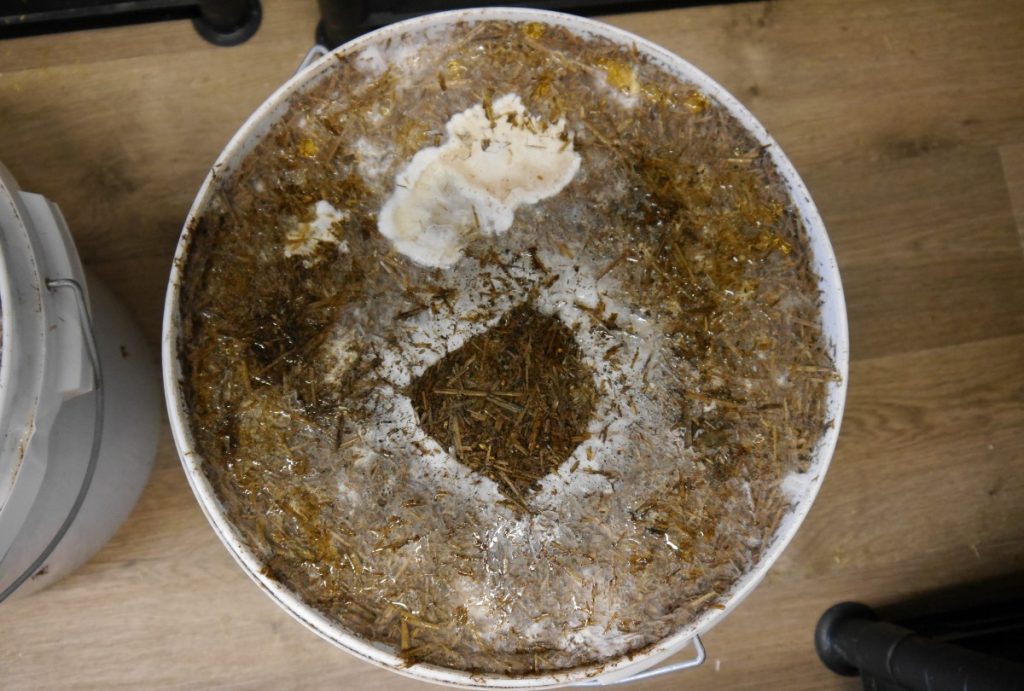
Step 3: Pasteurize Your Substrate
The purpose of pasteurization is to get your substrate relatively contaminate-free to give the oyster mushroom culture a good head-start.
There are two ways you can pasteurize your straw:
Hot Water Pasteurization
This method involves submerging your substrate in a large pot of hot water for one hour at 140 – 170F (60 – 80C).
Cold Water Lime Bath Pasteurization
This pasteurization method is less energy-intensive. It involves soaking your substrate in a bath of hydrated lime-treated cold water for 24 hours.
The lime increases the pH of the water, killing contaminants in the process.
Cold water lime bath pasteurization is one of our favorite methods of pasteurization. It’s the method we use on our farm and the one we’ll use in this guide.
Here are the steps to follow.
- Place your chopped or shredded straw into your netted bag.
- Fill your container with water to about 60 percent of its capacity to allow space for the substrate. If you make it too full, it will overflow when you submerge the substrate in the water.
- Using gloves to protect your hands, add hydrated lime to the water at a rate of 0.2% lime to water content. This equates to 0.07 ounces (2 grams) of hydrated lime for every liter of water.
Sprinkle the lime into the water and then stir well. It’s a good idea to wear a mask while doing this, so you don’t inhale any of the lime.
- When the lime has dissolved, take a sample of water and test the pH. You want a pH of between 11 and 13.
- Now you can submerge your bag of straw in the lime bath. Make sure it is completely covered.
You’ll find that the bag of straw tends to float, so weigh it down with a heavy object to keep it completely submerged.
- Leave the straw in the lime bath for 16 to 20 hours to pasteurize and hydrate.
- Wipe down any surface that you plan on using with your disinfectant spray (recipe above).
Also, make sure your hands are clean and disinfected throughout the pasteurization process.
- Remove the bag from the water and hang it from a rail or place it on a disinfected rack or surface. Leave it for at least an hour to drain.
The straw needs to be at “field capacity” before use, and it usually takes around an hour to reach this stage.
If you’re in a hurry, you can remove the straw from the bag and spread it on a clean, disinfected surface to speed up the process.
The easiest way to check is with the squeeze test. Squeeze the straw in your hand; a couple of drops of water should come out. If more than this occurs, it needs to drain for a bit longer.
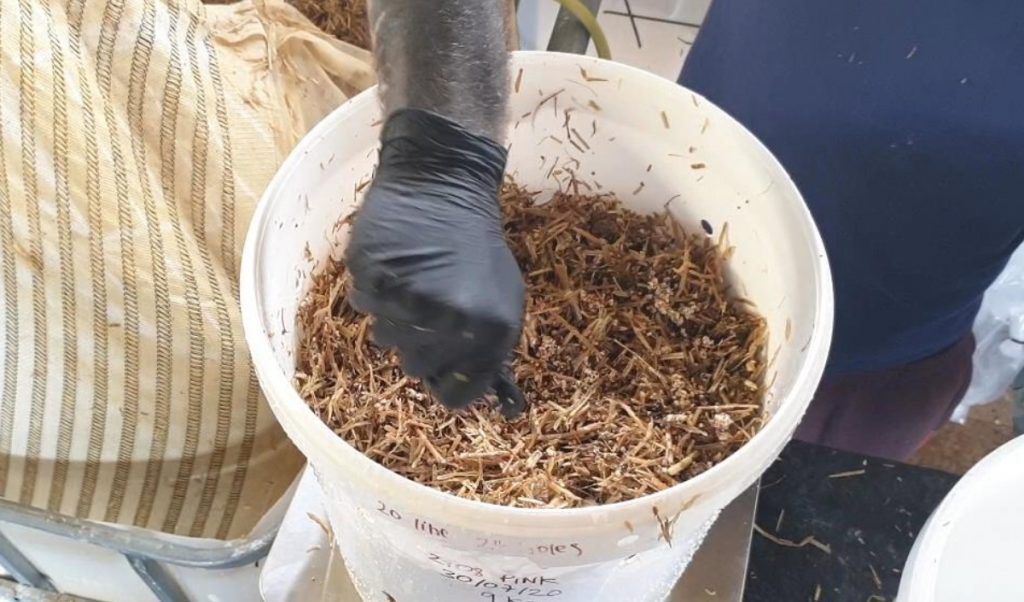
Step 4: Fill Bucket With Substrate & Spawn
Once your pasteurized straw has drained, it’s time to inoculate it. You’ll want to complete this step as soon as possible after pasteurization to prevent any contamination.
First, wipe the inside of your bucket with the alcohol spray. Then cover the holes on the sides of the bucket with a small square of micropore tape.
Now fill the bucket with layers of straw and grain spawn like a lasagna or layer cake. Start with the substrate at the bottom of the bucket, add a layer of spawn and then more substrate.
Continue layering the straw and spawn until the bucket is full. When you get to the top of the bucket, make sure your last layer is a layer of straw.
You need to fill the bucket to the top and pack it firmly but do not pack it so tightly that it pushes the tape off the holes.
Place the lid on the bucket and label it. Include the date, mushroom variety and substrate you have used. Doing this will allow you to experiment and improve over time.
Step 5: Colonize in a warm dark place
The mycelium needs to completely colonize the substrate before you can get a crop of mushrooms.
Put your bucket in a warm dark place, preferably one that is constantly warm both day and night.
The ideal incubation temperature is around 64 -75 F (18-24 C). In many places, this is the average room temperature.
At these temperatures, it should take 10-14 days for complete colonization.
After five days, you can open the lid and check for any patches of white, cottony growth on the straw.
With time, anywhere from 10 -21 days, the patches will join up, and the substrate will turn completely white with mycelium. The mycelium may even push off the tape and start to fruit.
Variations in temperature, the quantity of spawn used and species of mushroom being grown all affect the rate of colonization.

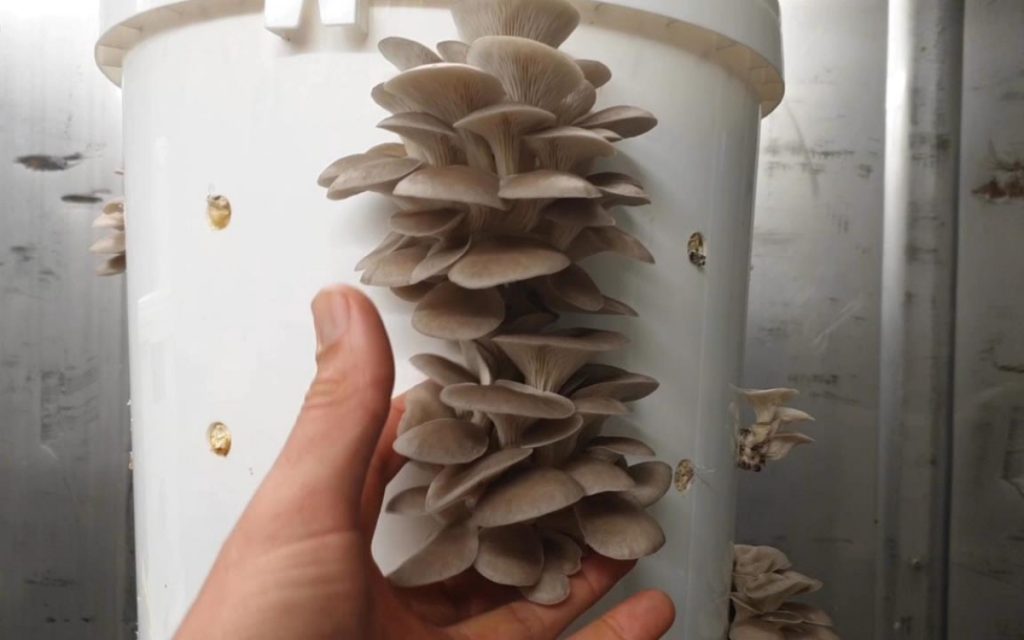
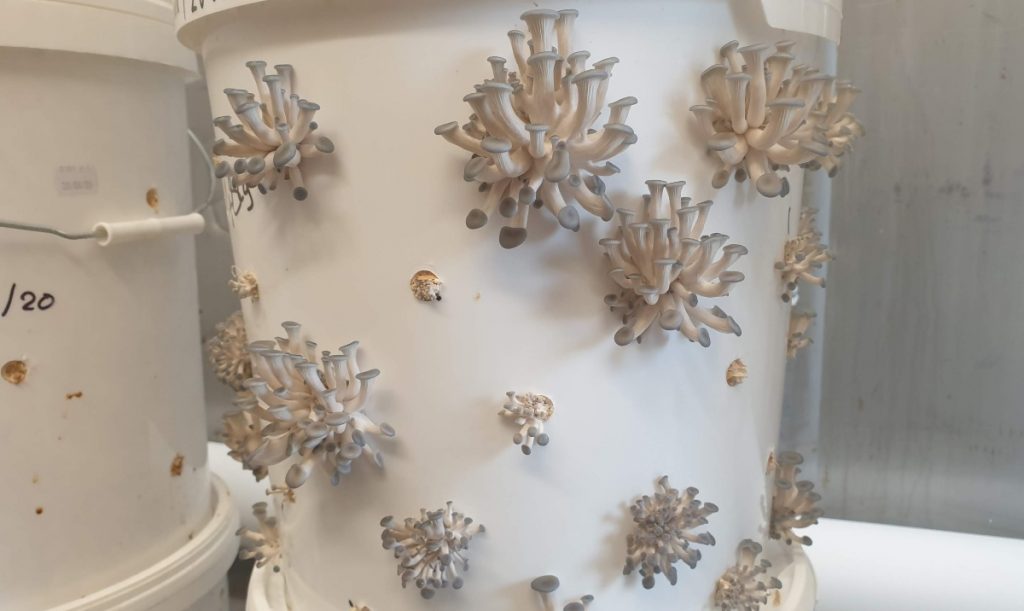
Step 6: Fruit Your Bucket
At the end of colonization, when the mycelium is about to run out of food (substrate), it will be eager to produce mushrooms in a bid for survival.
In the wild, mushrooms grow in response to stress, be it running out of food or changes in their environment.
To replicate this, all you need to do is provide the right conditions for mushroom development. Here are some of the things you need to consider.
Light
Oyster mushrooms need some light for the mushrooms to grow, but not too much. A shady spot with indirect light will work well.
Ensure the bucket isn’t in direct sunlight or too close to a light source or other heat source like a radiator.
Temperature
The ideal temperature for fruiting varies and is specific to each mushroom strain. But, generally (except for king oysters), most oyster mushroom strains are not too fussy.
They’ll grow best in their ideal temperature range. But, as long as the temperature is between 50 to 86F (10 to 30C,) the oyster mushrooms should still fruit.
Fresh Air
Exposing the mycelium to fresh air stimulates them into producing mushrooms. In the wild, oyster mushrooms grow out of stumps or logs in fresh oxygen-rich air.
To achieve this, remove the micropore tape from the holes on the bucket and ensure the spot you choose for fruiting has good airflow.
But, if you are growing them outdoors, you want a spot out of the wind as the mushrooms must not dry out while pinning.
Humidity
The challenge is to maintain the humidity levels while the baby mushrooms are developing.
The mushrooms will grow from the holes in the bucket, so it’s important to mist the holes a couple of times a day to prevent the mycelium from drying out.
Within seven days, you should start seeing tiny mushroom pins forming out of the holes.
Baby mushrooms enjoy high humidity, and if the pins dry out, they may stop growing. So mist as often as you can, or put a bag over the bucket to maintain the humidity.
Once past the pinning stage, the humidity levels are not as crucial. But, you should continue to spray the mushrooms twice a day to encourage growth and stop them from drying out.
Once they start pinning, mushrooms grow fast. In the five to seven days following pinning, the mushrooms will double in size every day. They will go from pins to full-sized mushrooms in less than ten days.
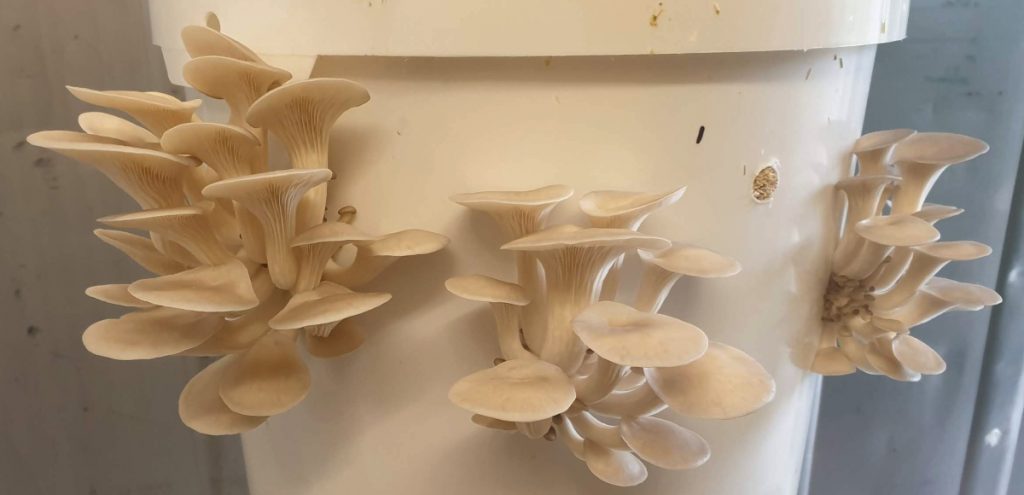
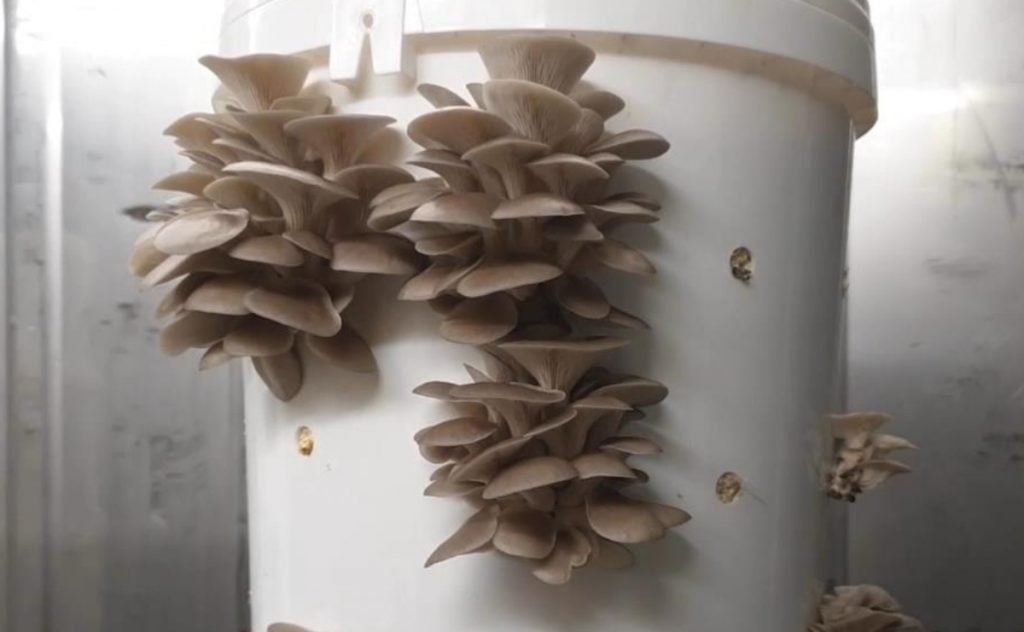
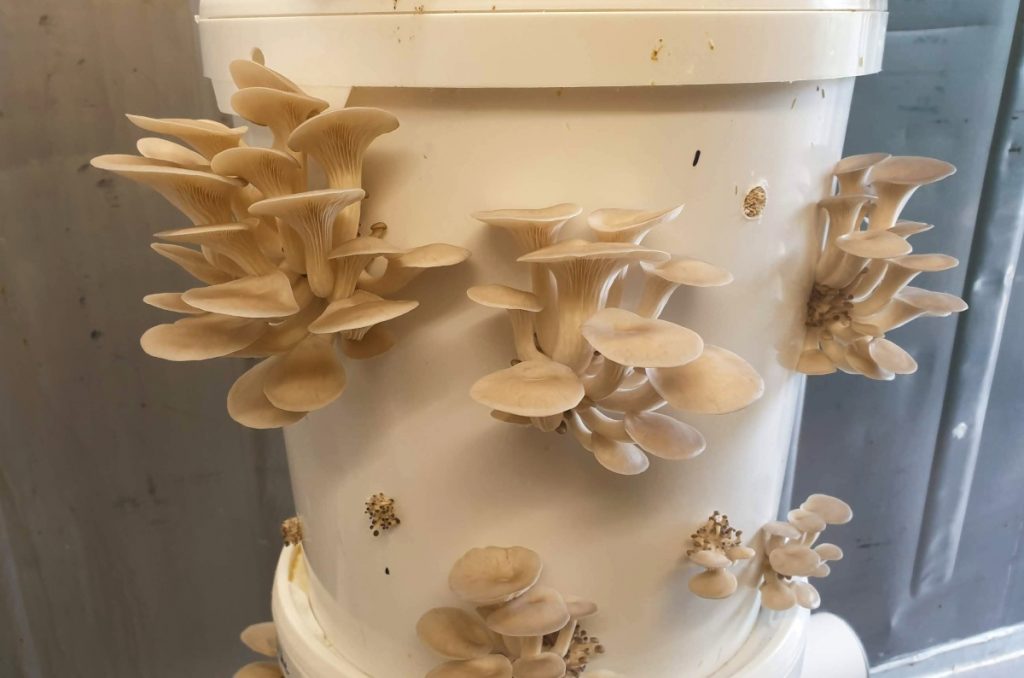
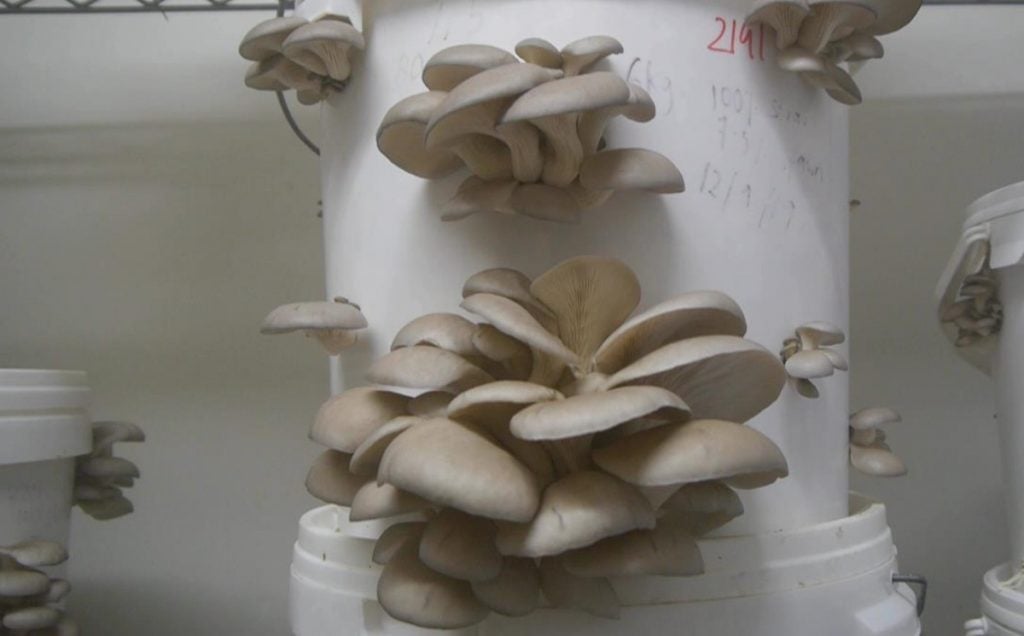
Step 7: Harvest Your Mushrooms
The best time to harvest your oyster mushrooms is when the caps of the oyster mushrooms start to flatten out and begin to curl upwards.
It means they’re nearly ready to drop their spores. It’s best to harvest them before they drop all their spores and start to lose their condition.
It’s not always easy for beginners to judge when this is. But, if your oyster mushrooms stop growing, start drying out or start dropping lots of spores (white dust), it’s time to harvest.
The easiest way to harvest your oyster mushrooms is to cut the whole cluster off at the back against the hole in the bucket with a sharp knife.
You can get a second and even a smaller third crop of mushrooms from your colonized substrate.
To help the process, make sure you remove any bits of stem left behind with a pointed knife leaving only substrate visible in the hole.
Continue to spray the holes twice a day with water. After a few days, the mycelium will recolonize the holes, and in one to two weeks, more mushrooms will emerge, and you’ll get another flush.
What Types of Mushrooms Can You Grow in a Bucket?
Several side-fruiting varieties of mushrooms can be grown in buckets. These mushrooms grow on trees in the wild and include lion’s mane and oyster mushrooms.
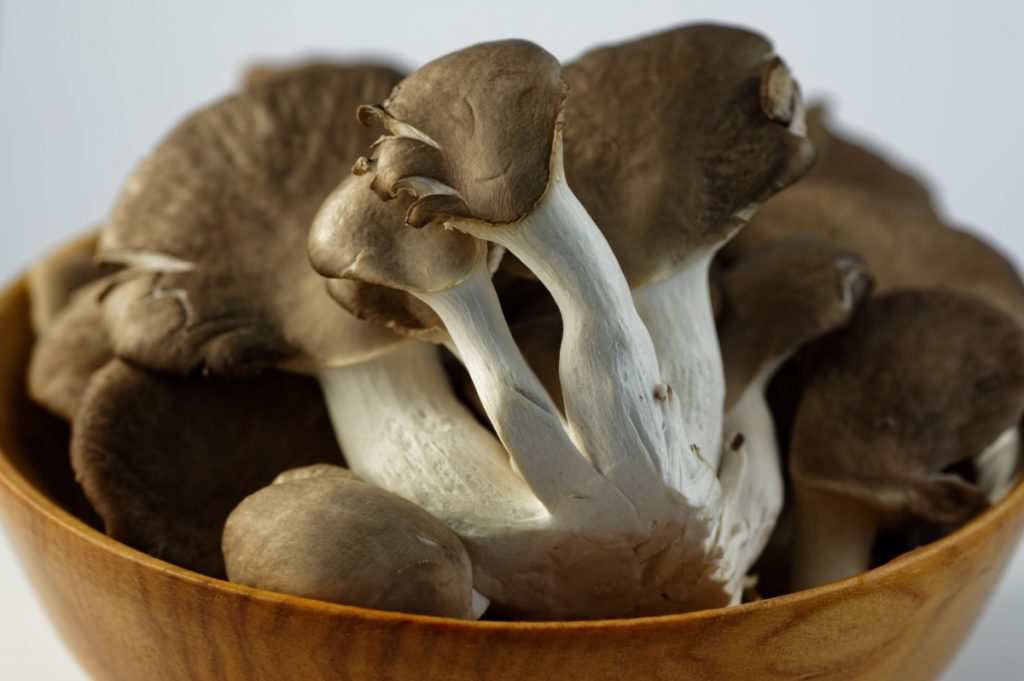
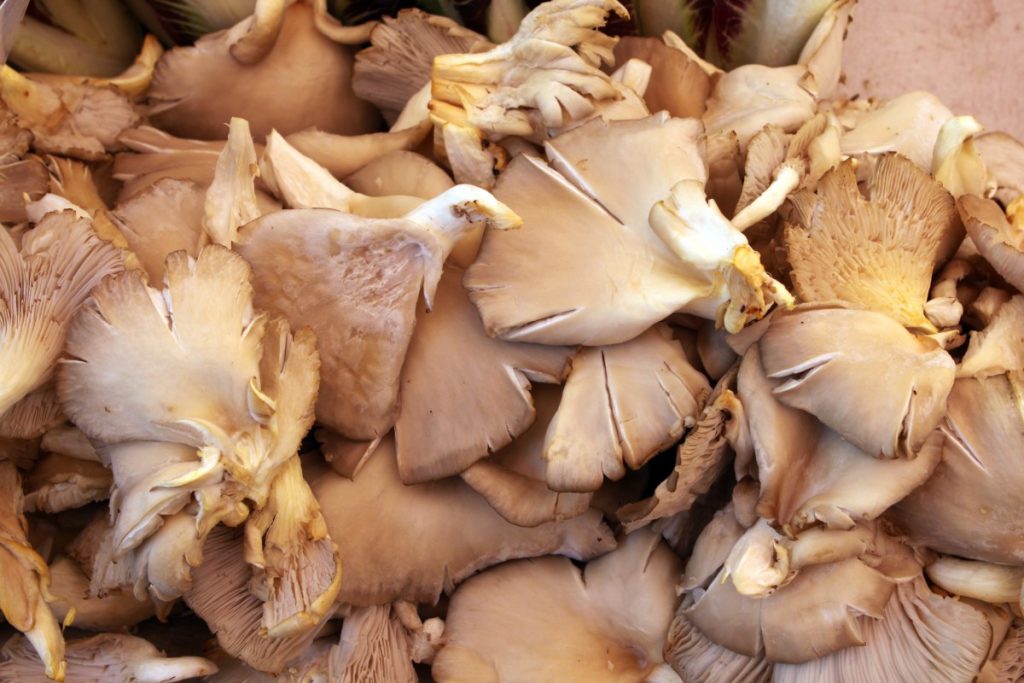
The best choice for bucket growing is oyster mushrooms. They’re fast-growing, less sensitive to growing conditions than many other mushrooms and grow on a wide range of substrates.
Side fruiting species of oyster mushrooms like the white, pink, blue or yellow oyster mushrooms are perfect for bucket cultivation.
King oyster mushrooms are predominantly a top fruiting species. In the wild, they grow on the ground. They aren’t the best oyster mushrooms for the bucket growing method.
They’re also a little fussier and more difficult to grow than other types of oyster mushrooms.
However, growing king oyster mushrooms in buckets is possible; they will grow in clusters like the other oyster mushrooms. But, they may not get as large or have the same characteristic thick stems.
Rather, try one of the other varieties of oyster mushrooms first, especially if you’re new to mushroom growing.
What is The Best Substrate for Growing Mushrooms?
The best substrate to use for growing mushrooms will vary, depending on the type of mushroom and whether you plan on growing them indoors or outdoors.
The method you’re going to use to grow them will also impact the choice of substrate. For example, are you going to use buckets, grow bags, mushroom beds or logs?
Different species of mushrooms prefer specific substrates.
Some common mushroom growing substrates are coffee grounds, straw, sugar cane bagasse, coco coir and vermiculite, sawdust, hardwood pellets, manure, logs and cardboard.
Our Complete Guide to Mushroom Substrates has more information on mushroom substrates and how to prepare them.
You’ll also find some mushroom substrate recipes and learn the preferred substrates of different types of mushrooms.
Best Substrates for Growing Mushrooms in Buckets
Oyster mushrooms grow well on a wide range of materials, but chopped wheat, barley or oat straw and sugarcane mulch (bagasse) work best when growing mushrooms in 5 gallon (20 liter) buckets.
The structure of chopped straw and bagasse allows these substrates to breathe well, making them a good choice for larger containers like 5 gallon (20 liter) buckets.
Sawdust and paper or hardwood pellets are better suited to smaller containers like jars, grow bags and 1 gallon (4 liter) buckets.
Their smaller particle size may create a compacted substrate with poor air exchange in the middle of a 5 gallon (20 liter) bucket.
Straw is the most commonly used substrate for oyster mushroom cultivation. It is usually cheap, contains essential nutrients, and oyster mushrooms thrive on it.
Pros and Cons of Growing Mushrooms in Buckets
Like all mushroom growing methods, growing mushrooms in buckets has both pros and cons. Here are some to consider.
Pros
- You can reuse the buckets, which reduces the amount of plastic waste you generate.
- Buckets are stackable, meaning you can optimize your space usage.
- Buckets are freestanding and don’t need extra support like larger grow bags.
- You can get commercial yields from buckets, but they’re better suited to small-scale operations.
- Buckets are readily available.
Cons
- Large buckets may not be easy to handle when full of substrate.
- It’s time-consuming to wash your buckets before reuse, making them impractical for large-scale commercial production.
- Increased risk of contamination.
- Potential to have anaerobic substrate cores in larger buckets.
How do you grow mushrooms in a bucket with coffee grounds?
Fresh coffee grounds make an excellent low-cost substrate for growing oyster mushrooms.
The great thing about fresh coffee grounds, by “fresh” we mean less than 24 hours old, is that the brewing process pasteurized them.
We recommend mixing 20 – 50 percent pasteurized straw into your coffee grounds when using them in a 5 gallon (20 liter) bucket.
The mix will prevent your substrate from becoming too compacted, restricting the airflow.
When growing mushrooms in buckets with coffee grounds, you can use the same steps as above with one extra.
At the end of step three, you’ll need to combine your fresh coffee grounds and pasteurized straw. Then move onto step four, filling the bucket and inoculating your substrate.
Our article growing mushrooms in coffee grounds has more information for you.
Can you grow mushrooms in buckets from store-bought mushrooms?
You can grow mushrooms from store-bought mushrooms. While this may be cheaper than buying grain spawn, it has a few disadvantages.
Firstly, you need to find a store that has fresh, healthy oyster mushrooms. Then check to see if you can find some with white fuzzy mycelium at the base of the stems.
If you manage this, you can use these stems to grow more mushrooms. But, it takes longer for the substrate to be fully colonized and increases the chances of contamination.
Here’s a quick breakdown of how you would grow mushrooms from store-bought mushrooms.
- Separate the stems from the mushroom caps and cut the ends where the fuzzy white mycelium is into small pieces. The best size for growing mushrooms from stem butts is ¼ inch (6 mm).
- Put the cut stem butts in a jar with freshly used coffee grounds. Leave them for a few weeks while the mycelium colonizes the coffee grounds.
- Now add the jar of fully colonized coffee grounds to your pasteurized straw in layers in the bucket. Leave the mix to incubate while the mycelium fully colonizes the straw.
Some people even skip the coffee grounds step. They combine the stem butts with pasteurized straw in layers in the buckets and then leave it to incubate.
However, you do not start with much mycelium when you go this route, so it takes longer to colonize the straw.
If you opt to go this route, it’s important to make sure your substrate stays moist throughout the process.
You’ll also need to watch for any green mold as the longer process increases the chances of contamination.
Common Issues With Growing Mushrooms in Buckets
Here are some of the common issues encountered when growing mushrooms in buckets and how to address them.
1. Uncolonized Substrate
Uncolonized substrate can happen when you have poor air exchange in the middle or if your substrate dries out.
Two things can cause poor air exchange.
- Compacted substrate. To prevent compacted substrate, we recommend using straw or bagasse when growing mushrooms in 5 gallon (20 liter) buckets.
Or, if using a substrate with fine particles like coffee grounds, mix them with 20 – 50 percent pasteurized straw to ensure good airflow.
Also, make sure not to pack the bucket too tightly when filling it.
- Holes too small. If the holes in the bucket are too small or there are not enough of them, it also leads to poor air exchange.
We recommend holes that are 0.4 – 0.6 inches (10 – 15mm) in size, spaced 4 to 6 inches (10 to 15cm) apart.
However, if your substrate dries out during incubation, it will also prevent colonization. Reasons for this could be holes that are too big or not enough humidity.
You can prevent this by using micropore tape over the holes and misting the holes twice a day. If necessary, place a plastic bag over your bucket to keep the humidity levels high.
2. Contaminated Substrate
If the middle of your substrate heats up too much, it can lead to contamination. Too much nitrogen in the substrate, an incubation location that is too warm or not enough air exchange can cause this.
The ideal temperature for incubation is around 64 – 75 F (18–24 C).
If it is too cold, incubation will take longer, and if it is too warm, you may get contamination.
3. Pins Not Forming
If your oyster mushrooms aren’t pinning, even in fruiting conditions, it could be for several reasons.
- Your bucket isn’t fully colonized. Check to see if the mycelium has grown throughout the straw. If not, you may need to wait a little longer.
- Your bucket is contaminated. If this is the case, you need to start the process again.
- There’s not enough humidity. Oyster mushrooms need high humidity levels to form pins. Try placing a plastic bag over your bucket or misting the holes with a spray bottle several times a day.
4. The Pins Are Aborting
If you see pins forming, but they then stop growing, it’s more than likely because there is a drop in humidity.
Sometimes you can revive your pins by spraying them with water. But, if they get too dry, they will no longer grow.
You can pick “aborted” pins off and wait for new ones to form. Make sure to keep high humidity by misting the pins often and, if necessary, placing a plastic bag over your bucket.
Final Thoughts
Growing mushrooms in buckets, as opposed to bags, is a great way to reduce the amount of plastic waste you generate.
It’s a great way for beginner mushroom growers to get started. You don’t need special skills, expensive equipment or previous experience.
Growing mushrooms in buckets is perfect for smaller-scale mushroom production. You can set up a productive mushroom cultivation system in buckets in a spare room, closet or basement.
Visit our Mushroom Growing Hub for more information and learn how to set up a low-tech mushroom farm.


