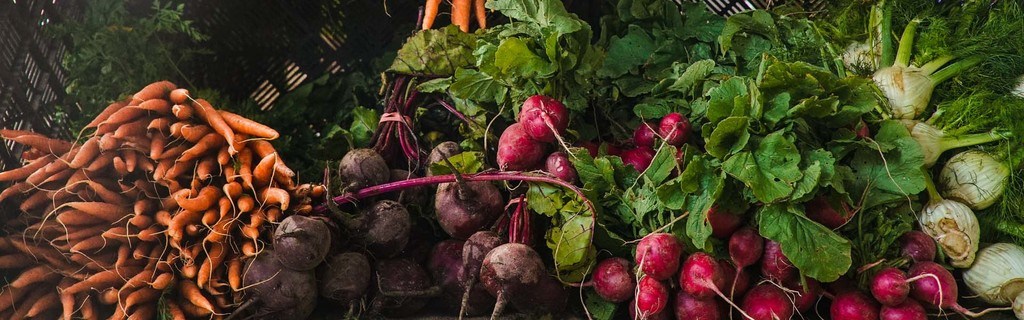
1. Radishes

Radishes are an awesome microgreen to start with. They germinate fast (1 to 2 days) in both warm or cool conditions, and grow quickly. Usually they’re ready to harvest in just 5 to 10 days.
Radishes are high in minerals, vitamins, and antioxidants. Radishes have been shown in studies to have cancer preventing properties.
Radishes are usually harvested when their first pair of true leaves start to grow, scientifically referred to as the cotyledon stage. If you wait too far past this point, your greens can start to become a little woody.
Don’t panic if you let your radish microgreens grow a bit too long though! They can still be great in stocks in soups.
Radish microgreens have a spicy flavor and they’re tender and crisp. They make a great garnish and add a splash of heat and color to salads.
White daikon radishes are a popular variety for growing microgreens.
Radish microgreens don’t need to be pre-soaked and prefer to be grown hydroponically, although they’ll also thrive in soil. Use about 2 ounces (56 grams) of seeds per 10″ x 20″ tray.
- Learn more about how to grow microgreens without soil in my Hydroponic Microgreens guide.
2. Broccoli

Full-grown broccoli is seen as a superfood, full of minerals, vitamin C and A, and high in iron. Broccoli microgreens have just as many nutrients as their full-sized counterparts, if not more.
Broccoli microgreens contain a compound called sulforaphane which as effects on cancer, aging, mortality, heart disease, brain and behavior, and more.
Sulforaphane is heat-sensitive, so you’ll want to avoid cooking your broccoli microgreens and opt to eat them raw instead.
3. Mesclun

Mesclun is a mix of assorted salad greens that may include arugula, lettuce, endive, chervil, baby spinach, swiss chard, dandelion, sorrel, or other leafy vegetables.
Instead of growing a bunch of different varieties of microgreens and then mixing them together later, you can simply grow them all at once from the beginning.
You can either buy pre-made mesclun mixes or combine your own seeds.
4. Beetroot

Beetroot (usually just called beets in North America) take a bit longer to grow than other microgreens. The blackout period for beetroot is 6 to 8 days, and they’ll germinate in 3 to 4 days. It takes 10 to 12 days from sowing to harvest.
Beetroot seeds should be pre-soaked for 8 to 12 hours in cold water and then sown thick, with soil being their preferred medium.
Once grown, beetroots are a vivid red microgreen that adds color to salads. They have a mild earthy flavor, sort of like full-grown beets.
This musty flavor comes from a compound in beets called geosmin, which is also responsible for the way the air smells after it rains, and even the flavor of some fish like catfish and carp.
Fun fact: Chard is actually the same species of vegetable as beets. Only it has been specifically bred for its leaves instead of its roots.
- Read my guide of Best Growing Medium For Microgreens to learn more about all pros and cons of this growing method.
5. Cress

Cress is another great choice for beginners. They’ll thrive in soil although you can even grow it on a paper towel.
The seeds of cress are very small and their greens bruise easily, so they need to be handled with care.
6. Arugula

Arugula microgreens have a sharp peppery flavor. It goes well in salads, sandwiches, and all kinds of other dishes.
This microgreen takes 2 or 3 days to germinate and is ready to harvest in just 5 to 7 days.
In the UK, arugula is often called rocket or roquette lettuce.
7. Carrots

If you like eating carrot roots, then you’ll love the similar flavor that they have in microgreen form.
However, carrot microgreens take a notoriously long time to grow. About 7 days to germinate, and another 4 weeks or more before they’re ready to harvest!
So don’t feel like you’ve done something wrong if your carrot microgreens take a while to start growing…
8. Peas

Pea microgreens need to be soaked in cold water for 12 to 24 hours. Give them lots of water while pre-soaking, because they will absorb a lot of it.
Transfer them to a bowl and mist them a few times each day until you start to see them sprouting. Then they’re ready to be planted in soil.
Since peas are so big, you’ll need to use a lot more of them per tray. About 12 ounces (340 ml) or one and a half cups of seeds per 10″x20″ tray.
Once they’re in soil, you should block out light for 3 to 5 days but continue to mist them twice a day. Keep their soil damp but don’t let it get soggy or they may start to rot.
Your pea shoots should be ready in 8 to 12 days. They have a sweet and familiar pea flavor with a very crunchy texture.
Fun fact: Pea shoots contain 8x the folic acid of bean sprouts, and 7x the vitamin C of blueberries!
9. Sunflower

Like peas, sunflower seeds really need to be pre-soaked for 12 to 24 hours to maximize your germination rate and success while growing them as a microgreen.
Sunflowers are rich in nutrient content. Especially vitamin E, folate, and zinc.
10. Amaranth

Amaranth microgreens are easy to grow and they sprout quite quickly. They take 2 or 3 days to germinate, and then another 8 to 12 days before you can harvest them.
They will stay fresh in the refrigerator for a fairly long time after you harvest them as well.
These microgreens are a vivid red color with a long slender pair of leaves. They make great garnishes for chefs and have a nice taste as well. Some say it tastses a bit like spinach.
11. Buckwheat

Buckwheat seeds are large like peas, so you’ll need to soak them in cold water for 12 to 24 hours and rinse them well before planting them.
Since they’re large, you’ll need to use about 12 ounces or 1.5 cups of seeds per 10″x20″ tray.
Buckwheat grows quite quickly, germinating in 1 to 2 days and being ready to harvest in 6 to 12 days.

At first buckwheat microgreens may have yellow leaves, but they’ll turn green in time if they’re getting enough light. These microgreens have a slightly tangy flavor.
12. Mustard

If you’re looking for a spicy and pungent tasting microgreen to add some zest to your salads or dishes, mustard is up there with other strong microgreens like radish.
You’ll definitely taste the characteristic mustard flavor even after cooking them.
Mustard microgreens take 3 to 4 days to germinate, plus another 6 to 10 days before harvest.
They grow pretty fast. But don’t worry if you let them grow a bit longer and they get past the microgreen stage and become baby greens.
They’re still young and tender enough to make a great addition to salads.
13. Basil

Do not try to pre-soak basil seeds. They’ll form a gel and all clump together, which makes them almost impossible to sow evenly on to soil afterward.
Instead, put them directly on to the soil and mist them to get them damp.
Basil germinates and grows quite quickly as a microgreen. But it requires more heat than any other type of green, so it’s best grown in summer.
Especially if you plan to grow it outdoors.
There are many different types of basil available including lemon, Thai, and cinnamon basil that you can experiment with. Each of these will have a different taste, even when they’re small microgreens.
14. Sorrel

If you’re looking for a microgreen that adds a bit of tart sourness to your recipes, sorrel is a great choice. It has a lemony flavor.
Sorrel takes about 4 or 5 days to germinate and is a bit slower to sprout, taking 12 to 20 days before it’s ready to harvest.
The most common variety for microgreens is red-veined sorrel. It has a similar appearance to spinach both in microgreen and full-grown form, but with thick red veins in its leaves.
You’ve probably seen wild sorrel many times while you were out walking without realizing it. It’s quite common and looks similar to clover.
15. Wheatgrass

Wheatgrass is simply the immature form of wheat. In microgreen form it looks quite similar to grass you’d find on your lawn if you let it grow extra long.
Wheatgrass is full of vitamins and minerals, but it doesn’t taste that great. Some people describe it as pungent and bitter. Personally, I just think it tastes like grass.
Either way, it’s best mixed into a smoothie or something sweet to cover up the flavor. Or if you’re really brave, you might just juice it up and drink it like a shot.
Fun fact: Wheatgrass is gluten-free in its early stages of development, so you can enjoy it even if you can’t normally eat wheat products.
16. Alfalfa

Alfalfa is one microgreen that really prefers to be grown hydroponically so you might not have great success growing it in soil.
You don’t want to pre-soak alfalfa seeds either. Just spread out one ounce (about 30 grams) of seeds on a 10″x20″ tray and block them from receiving light for 3 to 5 days.
Alfalfa takes 8 to 12 days before it’s ready to harvest. When it’s ready, it will have big deep green leaves and look similar to cress, but with a mild flavor and extra crunch. It’s great in sandwiches and salads.
17. Kale

Kale is another microgreen that prefers to be grown hydroponically. Follow pretty much the same instructions as outlined for alfalfa above and you’ll have kale microgreens in 8 to 12 days.
Eating kale as a microgreen is a great way to take advantage of its health benefits without the taste or texture of the fully grown stuff. In microgreen form, they taste more like a mild romaine or leaf lettuce.
They have an interesting appearance as microgreens, and sort of look like two leaves that have been fused together.
18. Collards

Collards also prefer to be grown hydroponically. Again, use about 1 ounce of seeds per 10″x20″ tray and don’t pre-soak them. They grow a bit slower than kale or alfalfa and will be ready in 10 to 12 days.
Collard microgreens have a dark green color. Unlike kale, they aren’t more mild than their adult counterpart.
In fact, collard microgreens are probably even more intense than the full-grown version.
The main difference is that they lack the thick, cabbage-like texture when they’re microgreens.
I don’t enjoy eating them by themselves, but they go well in a salad mix, or just as a garnish.
19. Clover

Clover microgreens prefer to be grown hydroponically and take about 8 to 12 days before they’re ready to harvest.
They have a fresh and mild flavor. The younger you pick them, the sweeter they’ll taste. They’re full of magnesium, iron, zinc, and calcium.
20. Kohlrabi

You might have seen kohlrabi for sale at the supermarket, but most people have never tried one. In German, the word kohlrabi means “cabbage turnip.” It’s actually the same species as cabbage, but it has been specifically bred for its root instead of its leaves.
Kohlrabi microgreens prefer to be grown hydroponically. They take about 8 to 12 days to grow.
When they’re ready, they’ll have green leaves and lavender-colored stems, which chefs like to use to add a pop of color to dishes. These microgreens have a mild cabbage or turnip flavor.
Like most microgreens, they go great in sandwiches or salads, but you can also incorporate them into a coleslaw.
They have a mild, cabbage-like flavor, so they make an excellent addition to salads, sandwiches or slaw.
Are Some Microgreens Easier Or Harder To Grow Than Others?

There are so many different kinds of microgreens, and each has its own requirements and its own needs to be grown successfully.
Below I’ll break down some common microgreens into categories that I think are easy, medium, or hard to grow.
Easy To Grow
- Radish
- Sunflower
- Arugula
- Wheatgrass
- Broccoli
- Cabbage
- Cauliflower
- Kale
- Lettuce
- Kohlrabi
- Mustard
- Clover
Medium To Grow
- Celery
- Cilantro (aka Coriander)
- Spinach
- Sorrel
- Leek
- Fennel
- Dill
- Anise
Hard To Grow
- Peas
- Amaranth
- Chives
- Beets / Chard
- Basil
- Cress
- Carrots
Don’t be discouraged if you want to grow a microgreen that I’ve listed as hard to grow though. Overall, microgreens, in general, are quite easy to grow.
Some like peas may just be difficult to keep properly hydrated without overwatering or underwatering.
Others like carrots have a long germination period that may make you question if you’ve made a mistake in your growing process.
I’d recommend everyone to start off growing radish microgreens first.
That’s just because they’re quick to germinate and reach full size. They’re the easiest to take care of.
Then, learn how to grow sunflower microgreens, which are also one of the easiest to get started with, and they taste delicous too!
- Learn more about why microgreens are the most sustainable crop to grow.
- Learn about Mushrooms vs Microgreens: Similarities, Differences, and How They Can Work Together and why they are both great crops that you should consider growing.
Which Microgreen Seeds Should Be Pre-Soaked?

Pre-soaking softens the shell of seeds and helps to jumpstart the germination process for some types of microgreens.
As a general rule, any very large thick seeds such as peas, buckwheat, wheatgrass, or sunflower seeds should be soaked between 6 hours and overnight.
Other seeds that should be soaked overnight include cilantro or coriander, and fenugreek.
Any grass / grain seeds like barley, oats, or alfalfa benefit from soaking too.
Some seeds like broccoli, radish, cabbage, kohlrabi, spinach, beet, and chard should be soaked, but not overnight or they may get too waterlogged and fail to germinate. Soak these seeds for just 1 to 2 hours.
Which Microgreen Seeds Shouldn’t Be Pre-Soaked?
You don’t want to pre-soak any seeds that become mucilaginous (form a gel) when they come in to contact with water.
This includes really tiny seeds like:
- chia
- basil
- arugula
- cress
- mustard
- flax
If you try to pre-soak these kinds of seeds, you’ll end up with a goo that’s too difficult to try and spread evenly on your tray or growing medium.
So instead, sprinkle them directly on to your soil and then spray them with a mist to moisten them.
I’d also avoid soaking kale, amaranth, lettuce, and similar seeds.
They don’t form a gel like basil, but they’re small and will be hard to evenly distribute once they’re wet.
Pingback: East-Rush-Candle – Alpine Anomalous
Pingback: What Are Microgreens And What Are The Health Benefits? - GroCycle
Pingback: Urban Farming Ultimate Guide and Examples - GroCycle