Are you wondering how to build a root cellar?
You might have a homestead or garden capable of producing lots of fresh fruits and vegetables.
But without some way to preserve them, they’ll likely go bad before you can eat them all.
That’s where having a root cellar can really come in handy.
Most newer homes don’t come with root cellars, though. So you’ll need to learn how to build one for yourself.
In this article, we’ll discuss what root cellars are, the different types of root cellars and how to build a root cellar.
Plus, we’ll go over how to store fruits and vegetables in a root cellar, the pros and cons of using a root cellar and more.
What Is A Root Cellar?
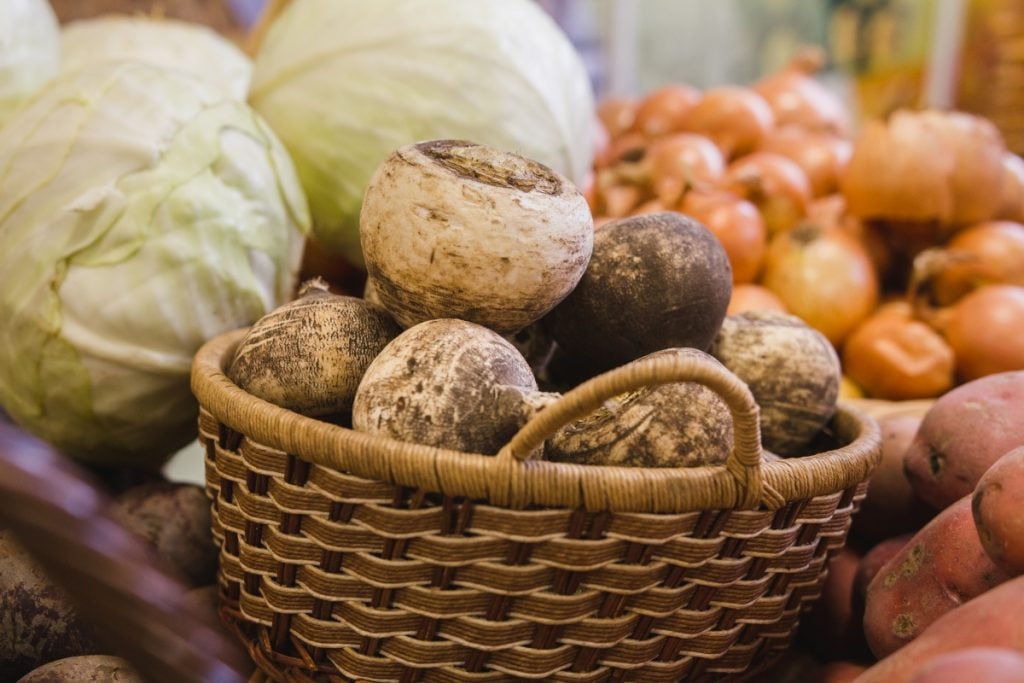
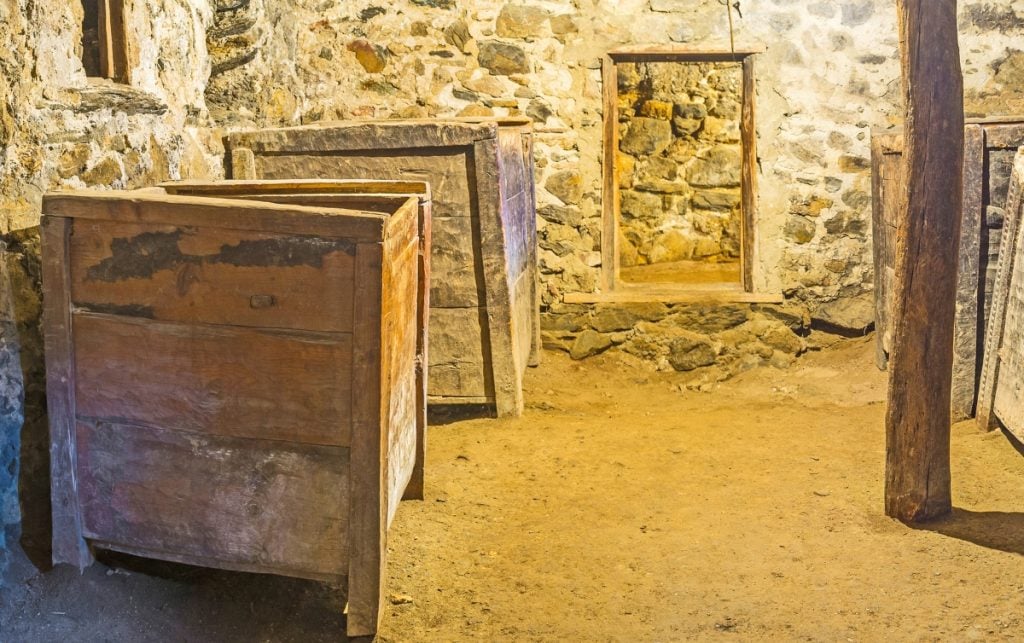
A root cellar is a structure used to store food like fruits, vegetables and nuts.
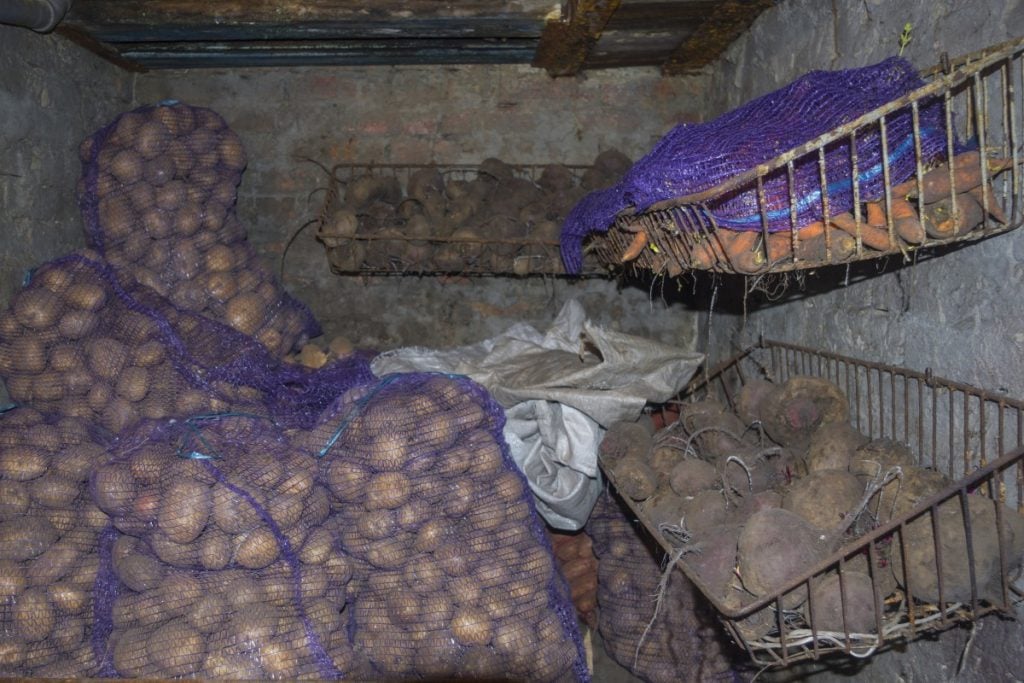
The name root cellar comes from the idea that traditionally they’d be used to store root vegetables like potatoes, carrots and beets.
Historically, root cellars were vitally important for storing food before the advent of electricity and refrigerators.
Root cellars were the only way that people in the past could keep fresh produce to eat all winter long.
Root cellars don’t use electricity. Instead, these structures are usually buried underground. That helps to keep them cooler in the summer and prevents stored produce from freezing in the winter.
Storing vegetables in a root cellar can help to keep the vegetables fresh for weeks or months longer than simply keeping them on the kitchen counter. The exact length of time will depend on the crop.
How Do Root Cellars Tie In With Homesteading?
Root cellars provide homesteaders with a greater sense of autonomy.
Nowadays, nearly every home has a refrigerator, so root cellars are largely unnecessary for the average person.
But for the homesteader, building an underground cellar is a great way to remain self-sufficient without the need for electricity.
If you’ve got a root cellar, your food spoiling when the power goes out is one less thing to worry about.
A root cellar is also a more efficient way to store large amounts of produce. One cellar can hold shelves and shelves full of vegetables.
Storing hundreds of pounds (or kilograms) of potatoes, squash and other vegetables is no problem for a root cellar.
It would take multiple refrigerators or freezers to store the same amount.
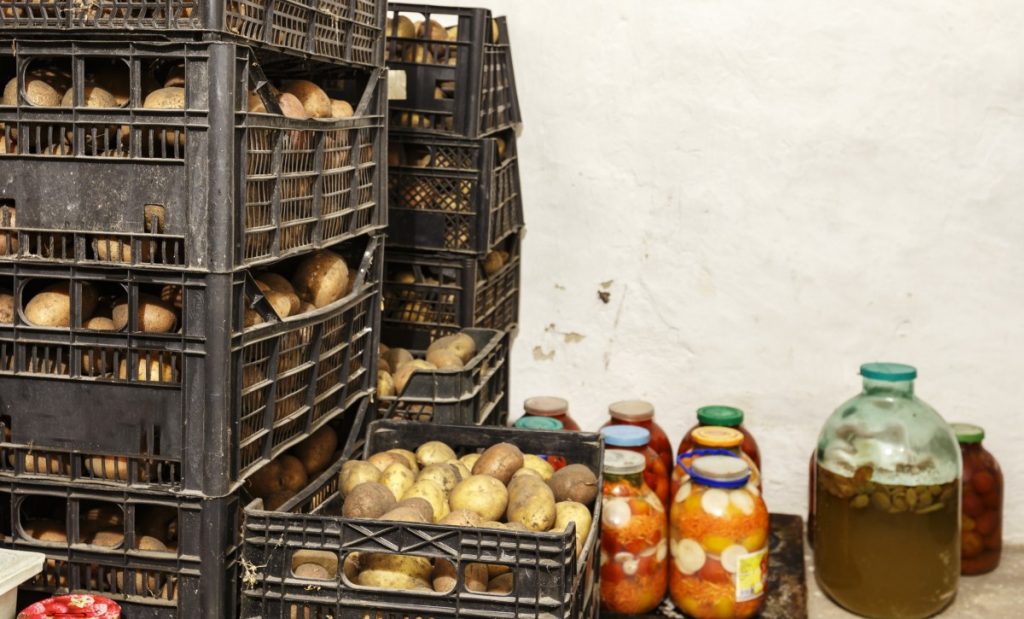
You can also store canned foods and other preserves in your root cellar as well.
If you’re wanting to store enough of your homestead’s vegetable harvest to last you all winter, then a root cellar is a must-have.
Check out our article 33 Practical Homestead Ideas for Every Homestead for some more helpful ideas for your property.
How Much Does it Cost to Build a Root Cellar?
The price of a root cellar can vary a lot depending on size, complexity and other factors.
A smaller, inexpensive root cellar might cost you a few hundred dollars.
But most larger root cellars will cost thousands of dollars between the cost of concrete, renting equipment and other factors.
How Can I Make a Cheap Root Cellar?
The biggest cost in constructing a root cellar is the materials. So if you can recycle or find used materials, you can make a cheap root cellar.
For small root cellars, it can be as simple as burying a barrel in the ground.
We have even seen videos of people repurposing old refrigerators and burying them to create tiny root cellars.
Old materials like used tires can often be found for free and repurposed to create the walls of your root cellar.
Following the principles used to create Earthships should provide some guidance on how you can upcycled materials to create a cheap root cellar.
If you need to earn a bit of extra cash to pay for your root cellar, be sure to read our article How to Make Money Homesteading: 48 Ways.
Types of Root Cellars
Root cellars need to be designed to hold a specific temperature and humidity range if you want them to operate at peak efficiency.
But aside from that, at its essence, a root cellar is just a container that’s buried in the ground.
That means there’s a wide range of root cellar designs that you can build. Ranging from the very simple to very complex.
Root cellars also vary in terms of the materials used to construct them. They can be made of wood, cement, stone, or other materials.
- Barrel root cellar. Perhaps the easiest way of storing your fruits and vegetables is by burying a barrel in the ground. Normally when describing a root cellar, we’re talking about a structure large enough to walk into. But if you only need to store a small amount, then a barrel or box could work.
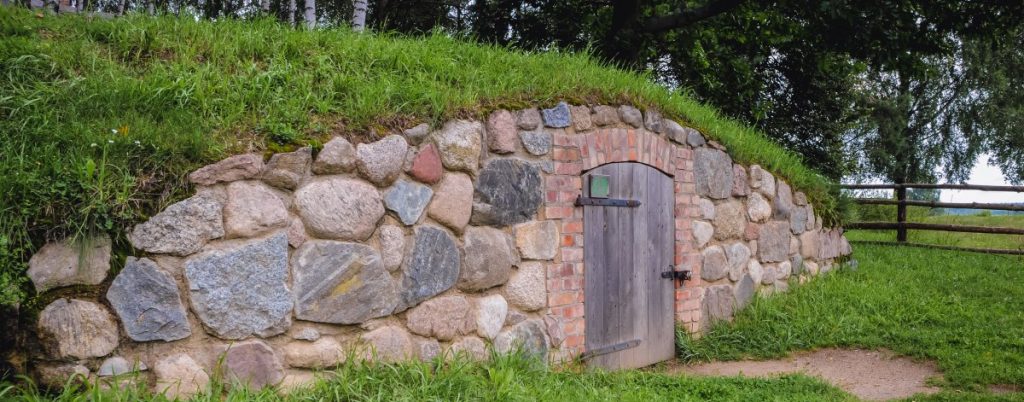
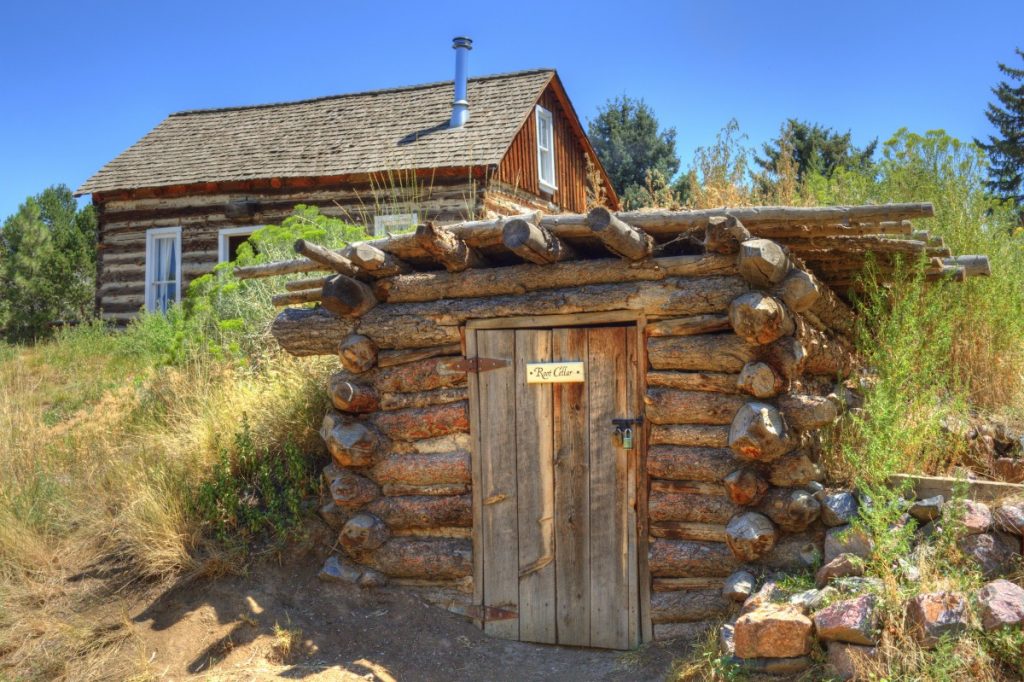
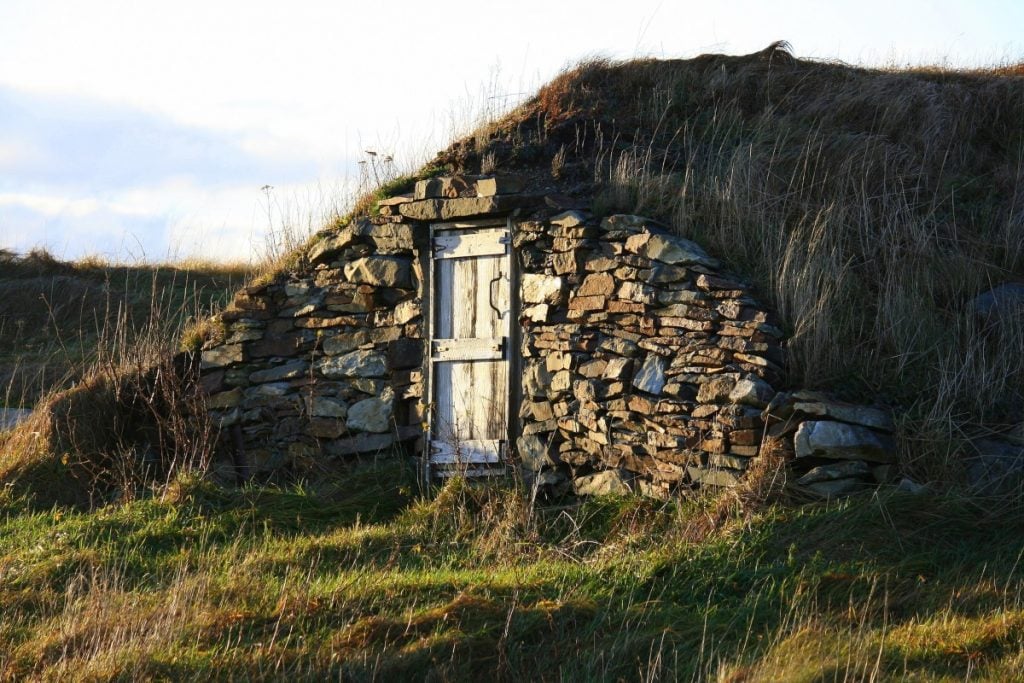
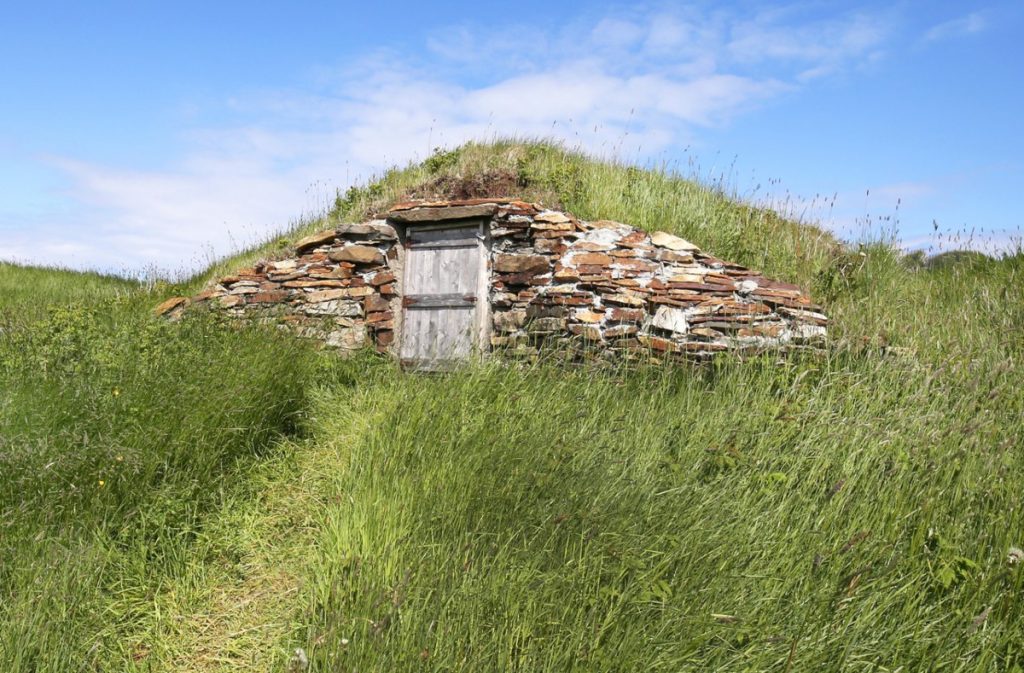
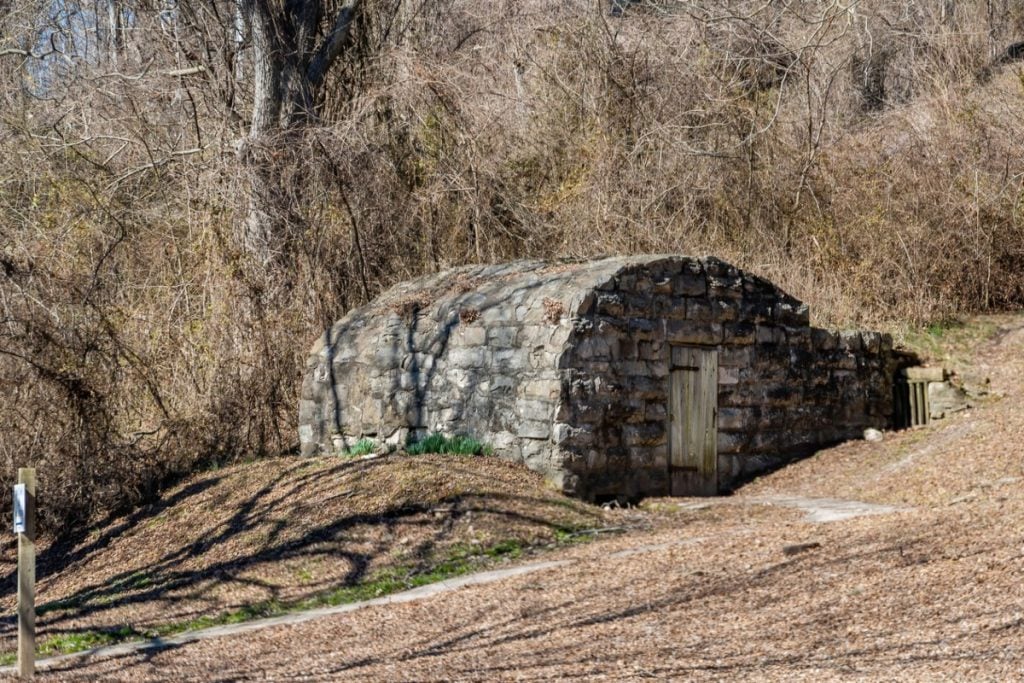
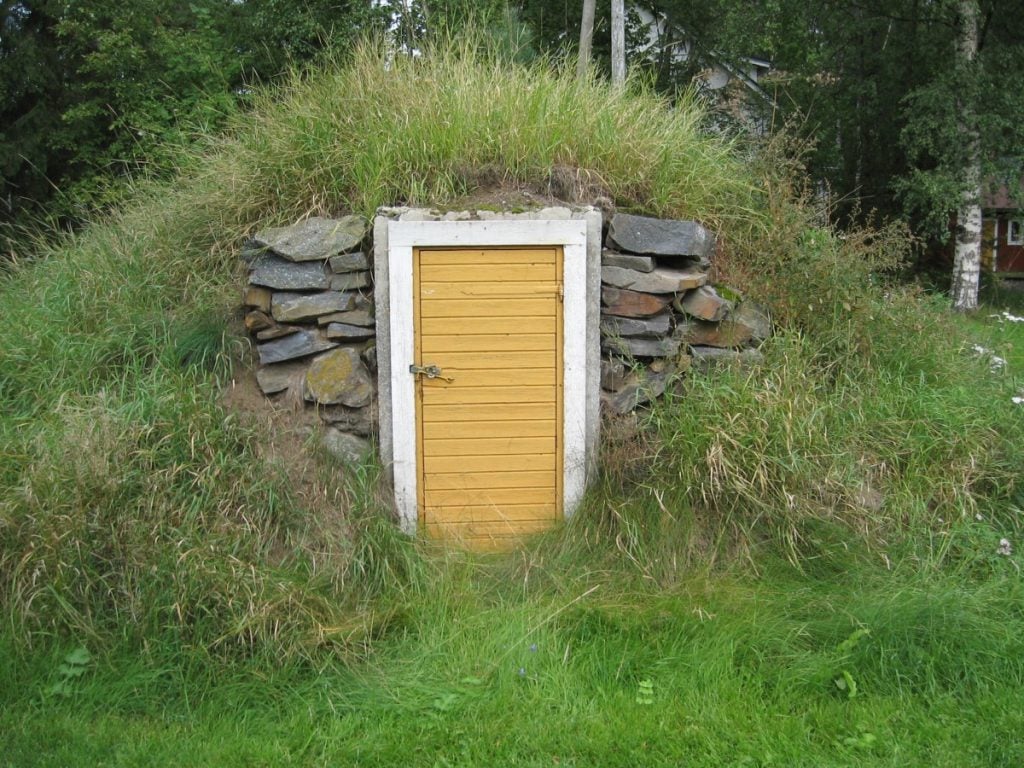
- Traditional root cellar. This is a purpose-built structure dug into the ground. It’s accessed via its own door outside, separate from the home.
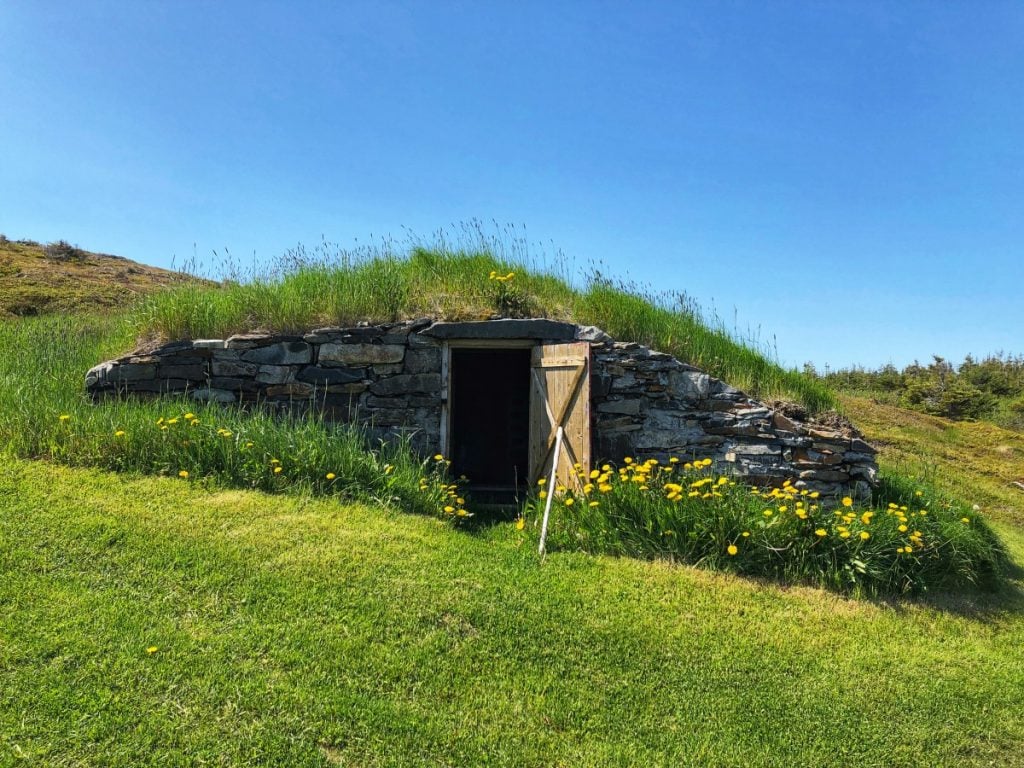
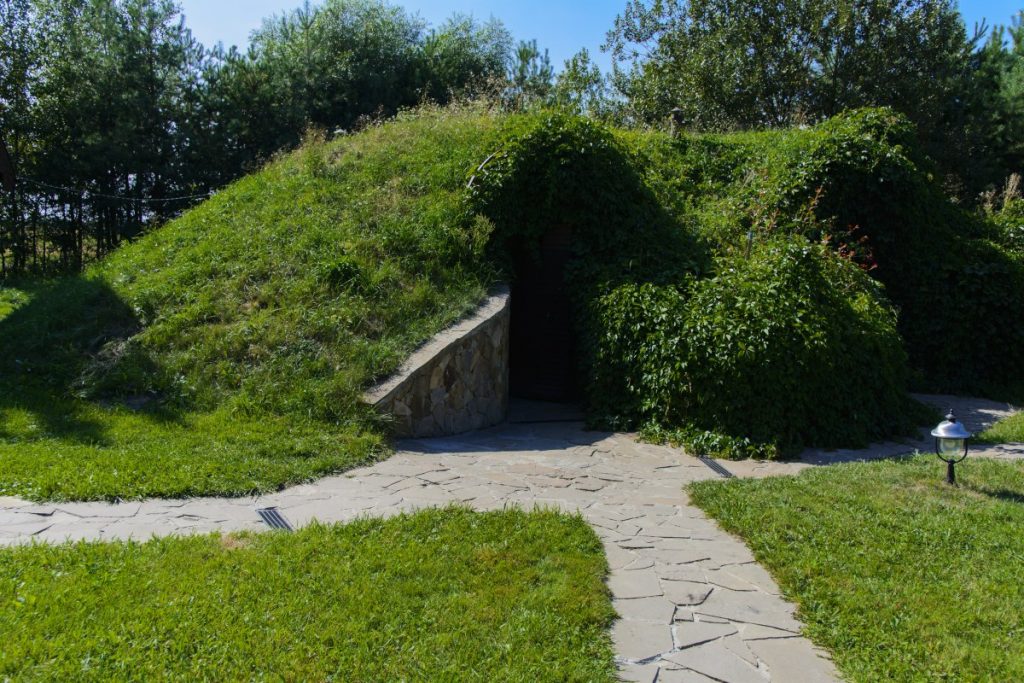
- Hill root cellar. How to build a root cellar in a hill: Instead of digging straight down into the ground, you can build a root cellar into the side of a hill and get a similar benefit. As an added benefit, creating a root cellar in a hill makes it easier to excavate.
- Under-structure root cellar. A cellar is dug into the ground. Then a house or a shed is built over top of the cellar. Access to the cellar can be via a trap door in a shed or under a porch, for example.
- Above-ground root cellar. Interested in how to build a root cellar on flat ground? Instead of digging down, the root cellar can be built at ground level. Rocks or soil are piled up around the structure to create a berm or hill. This is particularly useful if you live in a very rocky area where you can’t dig down into the ground.
Root Cellars In Different Climates
All of the above options should help to keep your food cool. But some will work better than others, depending on the climate that you live in.
Root cellars need to be able to hold a humidity level of 85 to 95% and a temperature of 32 to 40 F (0 to 5 C) to function properly.
They might not work in particularly warm or dry southern climates.
If you live somewhere like Florida with an average annual temperature of 70 F (21 C) then you’ll need to look into alternative ways to preserve your food.
In that case, you might want to try something like canning, dehydrating or fermenting the vegetables that you want to store instead.
How To Store Fruits and Vegetables In A Cellar
There are several ways to store fruits and vegetables in a cellar:
1. Pick Late-Maturing Crops
The later in the season that you harvest your crops, the more likely they are to maintain their freshness all winter long.
You don’t want to leave your harvest until so late that you’re worrying about frost.
But planting and harvesting with storage in mind will prevent your vegetables from sitting in your cellar for more time than is needed.
2. Select Storage Crops
Some varieties of each vegetable have been specifically bred for storage.
So when you’re buying your seeds or seedlings, take note of any varieties that mention being good for storage.
3. Don’t Wash Your Produce
Before putting your fruits and vegetables in the cellar, simply wipe them off with a dry cloth instead of washing them.
Washing your vegetables will cause them to absorb extra water, which makes them more susceptible to rot.
If your vegetables are very muddy and you absolutely have to wash them, be sure to dry their surface with a dry towel before storing them.
That will help to remove some of the excess moisture.
4. Cure Vegetables Before Storage (If Needed)
Some vegetables need to undergo curing before you store them.
Curing thickens the skins of your vegetables, making them last longer when stored.
Potatoes, squash, garlic and onions should all be cured before they’re stored.
Depending on the crop, the technique for curing them will be different.
Onions and squash can be “sun cured” by simply pulling them and laying them in the field for a few sunny days. Or you can lay them on a wire rack for a week or two.
To cure potatoes, store them for about a week in a dark area with high humidity, moderate temperatures and good ventilation.
5. Examine Your Produce Before Storing It
Any damaged fruits or vegetables should be used up first.
Damaged vegetables aren’t just likely to go bad sooner themselves. They can also spread mold and other contaminants to your healthy crops too.
You’ve probably heard the saying before, that “one bad apple can spoil the whole bunch.”
So after putting in all the time and effort to grow your vegetables, be sure to give them a good examination before storing them.
6. Don’t Let Food in Your Root Cellar Freeze.
The goal of your root cellar is to keep your fruits and vegetables cool, but not freezing.
Freezing will affect the texture of your vegetables and make them mushy. Freezing and unfreezing also makes your produce more likely to rot.
7. Get to Know Your Root Cellar
Even in a small root cellar, different areas will be warmer or cooler than others.
Root vegetables like beets and carrots will do best when stored low in your root cellar where it’s the coldest.
Crops like squash or tomatoes prefer to be a bit warmer, so it’s better to store them higher up on shelves.
8. Use Tools to Monitor Conditions
Ideally you want to have temperature and humidity gauges on the outside of your root cellar. That way you won’t need to enter the cellar to check.
Opening the root cellar unnecessarily will cause fluctuations in temperature and humidity, which will shorten the storage life of your fruits and vegetables.

9. Keep Ethylene-Producing Crops Away From Others
Ethylene is a gas that some plants produce that causes them to ripen sooner.
Apples, bananas, melons, peaches and pears all produce high amounts of ethylene. Tomatoes also produce a moderate amount.
Keep these fruits away from other vegetables. You may want to wrap them to contain the gas.
Many vegetables like green beans, broccoli, cabbage and carrots are sensitive to ethylene and should be stored far away. Otherwise they’ll become over-ripe and start to go bad prematurely.
10. Keep Strong-Smelling Crops Away From Others
Some foods like cabbage and turnips have a strong odor to them. Other fruits and vegetables can absorb the smell if stored alongside them.
11. Your Root Cellar Should Be Moist, But Not Damp or Wet
If your vegetables start to shrivel, that’s a sign that the humidity in your cellar is too low.
Vegetables can be covered in moist (not wet) leaves, straw or other materials to help keep moisture in.
You can also add a bucket of water to your cellar to raise the humidity. But be aware that this can also increase the risk of mold or bacteria growth.
Where To Build A Root Cellar
The word cellar comes from the Latin word “cella” which means chamber. So naturally, the best place for your root cellar is underground.
Making your cellar underground is recommended unless you don’t have any other option. For example, if the ground is too rocky to dig in.
The earth that covers and surrounds an underground root cellar helps to maintain a relatively cool and stable temperature.
How Deep Do You Dig a Root Cellar?
In warm areas closer to the equator, you’ll want to dig deeper in order to get cooler temperatures.
If you live near the arctic, you have the opposite problem to worry about. If you dig your cellar too deep, you risk hitting permafrost.
Permafrost is ground that remains completely frozen year-round.
But your cellar also needs to be below the frost line, which is the depth below the surface that anything in the soil won’t freeze at.
In most places, the frost line is about 36 to 48 inches (91 cm to 1.2 m).
So in some places, it can be a balancing act between making your cellar deep enough, but not too deep.
On average, your root cellar should be about 10 feet (3 meters) deep.
In terms of location, you want to avoid building your root cellar in a low area where it may be prone to flooding.
Also consider the distance from your home. You’ll mostly be accessing your root cellar in the colder months of the year. So don’t make your trek out to it any harder than it has to be.
A good option can be using one of the foundation walls of your home as one side of your root cellar.
Step-By-Step Guide To Building A Root Cellar
If you’re ready to get started building a root cellar, here’s how to do it!
Supplies Needed
What you need to build your root cellar will largely depend on your design.
- You might build your cellar with bricks, cinder blocks, concrete, rebar, wood, or other materials. You’ll need to refer to your design and see what materials are needed.
- You will also need some way to dig. For small cellars, you might be able to dig it by hand with a shovel. But for most cellars, this isn’t practical.
Bringing in a backhoe or excavator is well worth the money instead of trying to dig out a room-sized hole by hand.
Once you’ve got your supplies on hand, here’s how to build a root cellar step by step.
Step 1: Dig The Hole
Almost any type of root cellar will require you to dig a hole. You might be digging straight down into the ground, or into the side of a hill.
But regardless, you’re going to need to move a lot of dirt.
The larger your root cellar design is, the more digging you’ll have to do.
Your root cellar doesn’t need a full foundation. Most root cellars have dirt floors. In fact, dirt floors can help maintain higher moisture and humidity levels in your cellar.
However, you’ll need to add walls to your root cellar to prevent dirt from caving in over time.
To do that, you’ll need footers. This is basically poured concrete that you’ll build your walls on. It will prevent them from shifting over time.
Step 3: Build Your Walls
The walls of your root cellar need to be able to withstand moisture and cold temperatures.
Bricks, concrete or cinder blocks are all good low-cost options. You could also get more creative and recycle old materials like used tires.
To build the walls of an 8 x 8 foot (2.5 x 2.5 meter) root cellar, you’ll need approximately 350 cinder blocks.
Step 4: Build Out The Shape For Your Roof
If you aren’t very handy with DIY tasks, you may want to consult a professional builder for this step.
Or at least refer to some building plans for a root cellar that were made by an engineer or architect.
Getting the roof correct is important. You don’t want to risk having your root cellar cave in and injure someone, or destroy all of your vegetables for the year.
A flat roof isn’t recommended. You’ll want a bit of arch in the roof to allow condensation in your root cellar to run down the sides. Otherwise you may run into issues with mold and mildew.
One common way of making the roof is to build the shape out of plywood.
Then cover it with plastic sheeting. Finally, reinforce it with rebar to keep the concrete in place and distribute the weight.
Step 5: Finish The Roof
Once the basic shape of your roof is in place, you can pour concrete.
It’s important not to enter your root cellar until the concrete has fully cured.
For even a small root cellar, you’ll need to pour thousands of pounds (or kilograms) of concrete. So you don’t want to stand underneath it until all risk of a collapse has passed.
Step 6: Add The Finishing Touches
Once the basic structure of your root cellar is completed, there are some details you’ll want to add to it.
First, you’ll want to install stairs. Currently your cellar is underground with steep walls and no easy way of getting in and out. You need some way of getting down into your cellar.
Second, you want a door to seal your root cellar. This will prevent it from being exposed to the elements. It will also help prevent rodents and other pests from getting in.
You may want two doors. One to cover the entrance of your root cellar and another at the bottom where your staircase opens up into the cellar.
Lastly, you may want to add a couple of vents to allow for air exchange. This might involve some drilling into the walls of your cellar.
If your area gets a lot of rain, you may want to add some drainage along the outer walls of your root cellar as well.
The easiest way to do this is with a french drain. Basically filling with gravel around the outside of your cellar wall. This will let rainwater drain outward and away from the walls.
Before you construct a root cellar, you’ll need somewhere to grow all your food. Our article How To Start a Homestead: Step By Step Beginners Guide will teach you more.
Considerations When Building A Root Cellar
Here are some things you’ll want to control when building a root cellar.
Temperature
A root cellar needs to be between 32 and 40 degrees F (0 to 5 degrees C) to function properly.
If your root cellar is too warm, then harmful bacteria can grow and multiply.
Having your cellar cool will help to keep your fruits and vegetables fresh for longer.
A good root cellar keeps your produce cold enough, but not so cold that it will freeze in the winter.
Your root cellar should have a thermometer to measure and track temperature.
Humidity
Humidity levels in your root cellar should be between 85% and 95%.
Otherwise your vegetables will lose moisture via evaporation and start to wither.
Soil naturally has a good amount of moisture in it. So having a dirt floor in your root cellar is usually enough to keep your humidity high enough.
If you find that isn’t enough, you can cover your produce in damp (not wet) sawdust, sand, burlap bags, straw or other materials.
You’ll want to have a hydrometer in your root cellar so that you can track humidity. Monitor it regularly.
Ventilation
Does a root cellar need ventilation? In most cases, yes.
Proper ventilation is key to preventing too much moisture and ethylene gas from building up in your root cellar.
These things can cause your produce to become moldy or over-ripe prematurely.
Your root cellar should have both air intake and exhaust vents to provide proper air circulation.
Incoming air vents should be low to the ground to bring in cooler air from outside.
Exhaust vents should be higher in the cellar, close to the ceiling, since warm air rises.
Place your intake and exhaust on opposite sides of your root cellar for best results.
Darkness
Many crops use light as an indication to start sprouting.
To prevent this from happening, you’ll want your root cellar to be as dark as possible.
Make sure your doorways are completely sealed so sunlight doesn’t come in. And have any lights in your root cellar turned off whenever you aren’t inside.
Root Cellar Issues That Can Occur and How To Troubleshoot Them
1. Poor ventilation – Install proper air intake and exhaust vents in your root cellar as discussed above. In some cases, you may also need to have a fan in your cellar to help with air circulation.
Bad airflow can also be the product of poorly-designed shelving. Make sure that your shelving allows for good airflow.
Be sure to leave some space around objects on the shelves so air can circulate around them.
2. Buildup of ethylene gas – Keep fruits that produce ethylene separate from sensitive crops. Consider bagging or covering them to prevent ethylene from escaping.
If you store large amounts of ethylene-producing crops like tomatoes, apples, or peaches then you may want to even give them their own separate storage area.
3. Lighting – Make sure that you block all light from getting into your root cellar. If your cellar is underground, it should be pitch black with the doors closed.
Identify any cracks that are letting light in and seal them up.
It’s important that jars of canned goods also don’t get exposed to too much light. So it’s good to store these in your root cellar along with your produce.
4. Humidity too low – Add damp materials like sawdust, leaves, or straw to cover your root crops and other produce.
You may even want to leave a bucket of water in the middle of your root cellar. Although be aware this can increase the risk of mold and bacteria and may also attract pests.
Pros and Cons of Building a Root Cellar
There are good sides and bad sides to building a root cellar.
Root Cellar Pros
1. Increased food security – A root cellar enables you to store months of food at a time. It allows you to be more self-sufficient.
Even in an emergency where a road or bridge washes out and you can’t get into town, or during a blizzard in the winter, you’ll be able to go several weeks without leaving your property.
2. Store more food for longer – There is only so much food that you can fit into your refrigerator or freezer.
A root cellar is a must-have if you’re trying to preserve hundreds of pounds of potatoes and squash.
3. Saves money – Even if you aren’t able to grow 100% of the food that your family eats, a root cellar can still save you money.
You can buy fruits and vegetables in bulk during harvest season. That’s when produce is the freshest and cheapest.
Then you can preserve it and store it in your root cellar for year-round use.
Root Cellar Cons
1. Expensive to build – A root cellar is a small external structure on your property, much like a shed. It will take thousands of dollars worth of materials to build.
You also need to factor in the cost to rent any equipment that you don’t own.
2. Hard work to build – Making a root cellar involves a lot of manual labor moving around dirt, concrete and cinder blocks.
If you have a full-time job, you might only be working on your root cellar for a few hours per day in your spare time. In that case, it might take you weeks to complete the entire project.
3. There’s a learning curve – Every root cellar is different. Since you’re relying on the earth to cool your produce, the conditions aren’t as uniform as a refrigerator.
You’ll need to learn which areas of your root cellar are the coolest and most moist. And you’ll need to know which products that you’re storing prefer which kinds of conditions.
4. Maintenance – You’ll need to keep the floor moist and keep humidity at a high level.
Certain types of vegetables like to be more damp than others and you may need to cover them with damp materials.
If mold or mildew starts building up in your root cellar, you’ll also need to clean it before it gets out of hand.
5. Inconvenient – It can be a nuisance to head out to the root cellar to get food, if it’s not right against your house. Especially in the cold of winter or in the middle of the pouring rain.
Best Root Cellar Building Books
If you’d like to learn more about building root cellars, pick up one of these reads:
“Build Your Own Underground Root Cellar” by Phyllis Hobson – This was published in 1983 and has stood the test of time.
It’s only about 30 pages long, but packed full of useful information. Usually you can buy a copy for just a few dollars as well.
“Root Cellaring: Natural Cold Storage of Fruits & Vegetables” by Mike Bubel – This book goes into some depth about constructing your own root cellar than the previous title.
It’s also nearly 300 pages long. It covers everything from choosing which storage vegetables to plant, through to harvesting and storing them.
“The Complete Guide to Your New Root Cellar” by Julie Fryer – Learn different design options for root cellars. Including how to build a root cellar in your basement
This book lays everything out along with which times of year are optimal to do them. Once your root cellar is done, it also goes over yearly maintenance needs.
“Building a Homestead Root Cellar” by Teri Page – This book provides a step-by-step guide to building a root cellar as we’ve described in this article. Only it goes into a lot more detail.
You’ll learn how to plan the right size for your root cellar and everything to do with building it.
Final Thoughts
A root cellar is a must-have for any homesteader that’s looking to become more self-sufficient and store their own food year-round.
Building a large root cellar is a big undertaking and will require a lot of work. But once it’s built, it will pay dividends for years to come in the form of keeping your produce fresh.
Ready to get started on your own homestead? Be sure to read through the rest of our homesteading articles for some more great ideas!